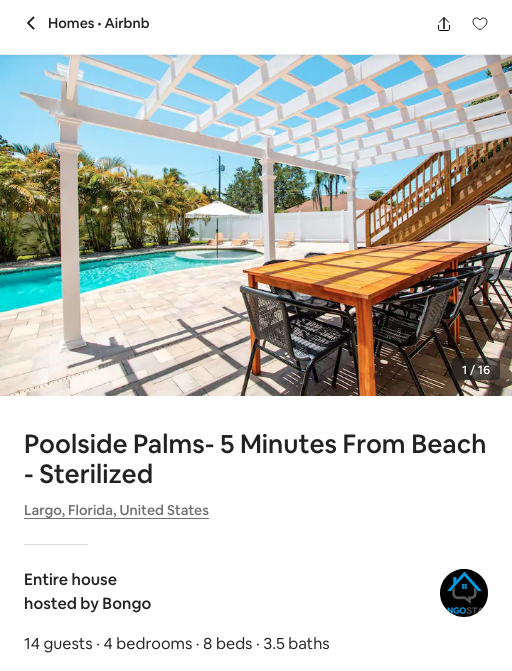
The day has finally come… our beach house rental is up and running!!!
We went under contract on this home back in early March, and closed just a few weeks later. The last three months have been an absolute mad dash to get this place fully furnished, stocked and ready to rent. This process has certainly not been smooth sailing (not that we expected it to, especially in the middle of a pandemic) but all things considered, we’re so glad we took on this project—and relieved that the hardest part is over!
I could write for hours about our experience on the investment/logistics side of starting an AirBnb, but I think most of you are here just to see the room reveals so I’ll keep that part brief. I figured you’d be interested to know the total startup costs for something like this, so I’ve included it in my breakdown at the end.
Jump to:
Let’s get up to speed first…
As an investment property, we had to work within budget + deadline constraints for it to be profitable. This meant essential furnishings and minimal improvements only—no kitchen or bathroom renovations. We hired out as little as possible and only had weekends to work on it ourselves, so we had to be very selective with our time (we didn’t even paint the walls). As a rental with a high turnover rate, the design had to be kept simple with inexpensive and easily replaceable items. To keep costs down, I bought as much as I could secondhand online (mostly Facebook Marketplace) and also because shopping elsewhere proved to be difficult during all the shutdowns (I had to repurchase $2k worth of essential items at the last minute and IKEA still hasn’t refunded me for the order they never shipped!)
All of this to say… this isn’t the typical house tour/reveal you’d expect on this blog with dramatic makeovers and magazine-worthy, perfectly staged photos. It’s the result of three months of hard work, endless hours of bargain hunting and deal negotiating, late nights of furniture assembly and DIYing on a serious budget—resulting in a laid-back, cozy and comfy vacation home that has something for everyone in the family.
We hired a property management team, since managing a short term rental is a big job and we simply don’t have the time or capacity to take this on ourselves. So far we’ve been very involved though, checking in on the house between bookings and working with the cleaners to ensure everything is up to our standards. It has been a pretty steep learning curve and we’re working out some kinks, but that’s to be expected as we navigate this world for the first time.
Without further ado, welcome to Poolside Palms…
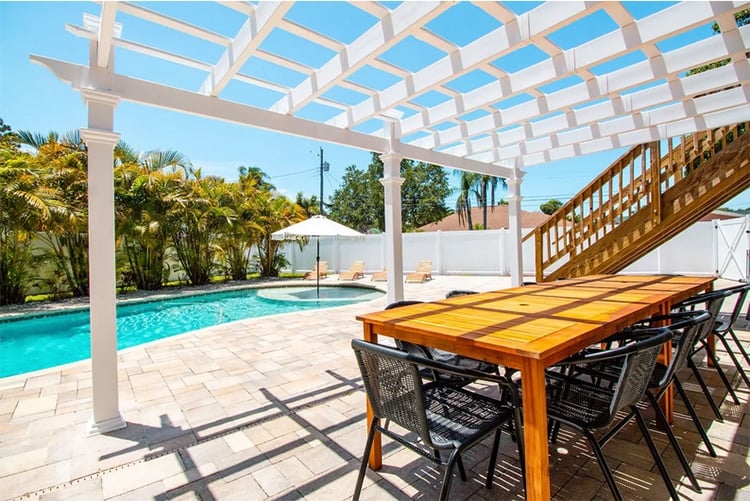
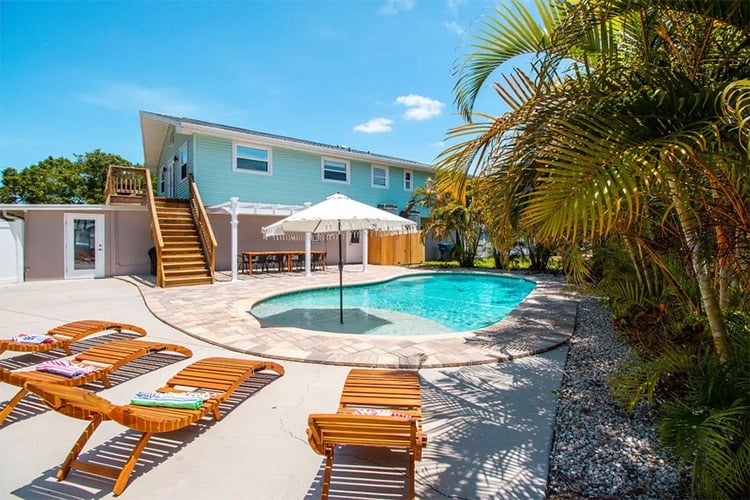
Backyard: Before
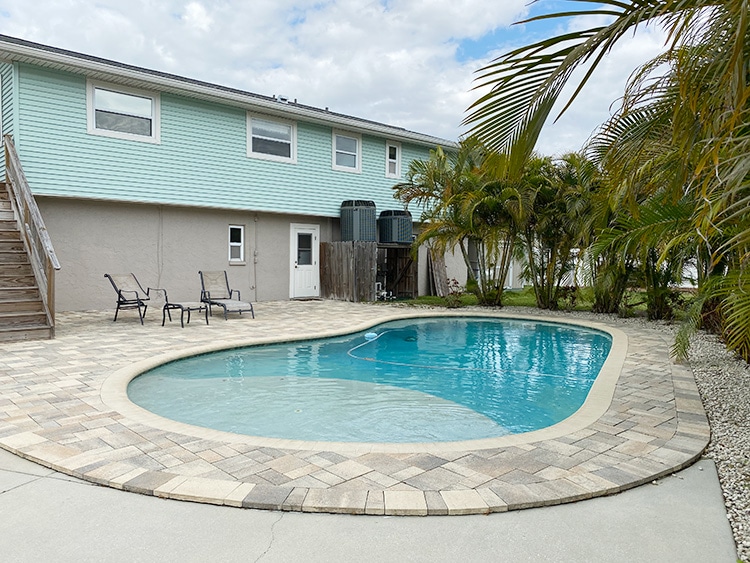
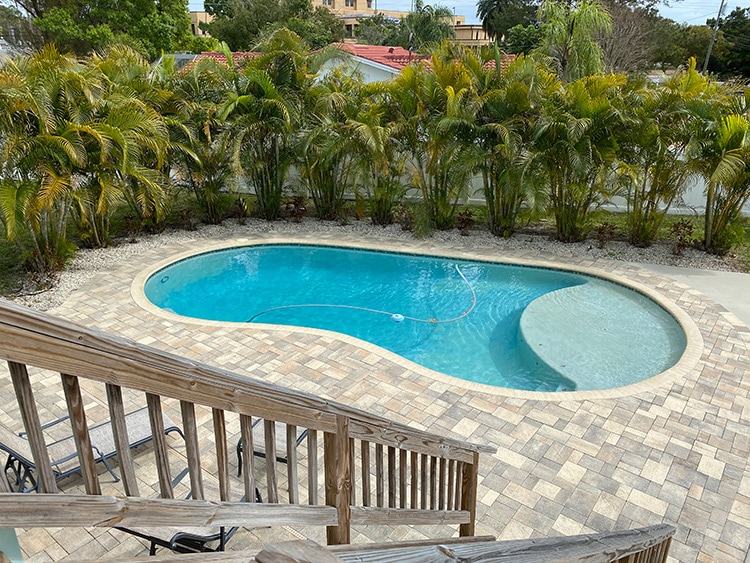
Backyard: After
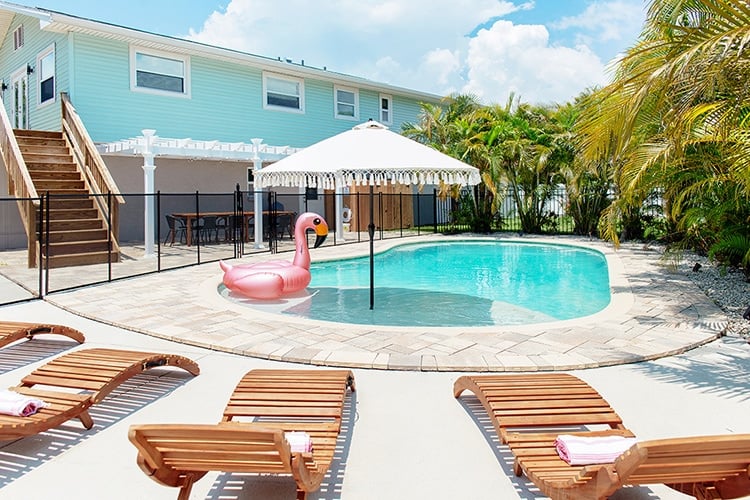
I’m starting with the backyard because it’s the main reason we bought this house, and the selling point for vacation goers. The biggest improvement we made back here was adding a pergola, which completely changed the look of the house and elevated the design (and it wasn’t a huge investment!)
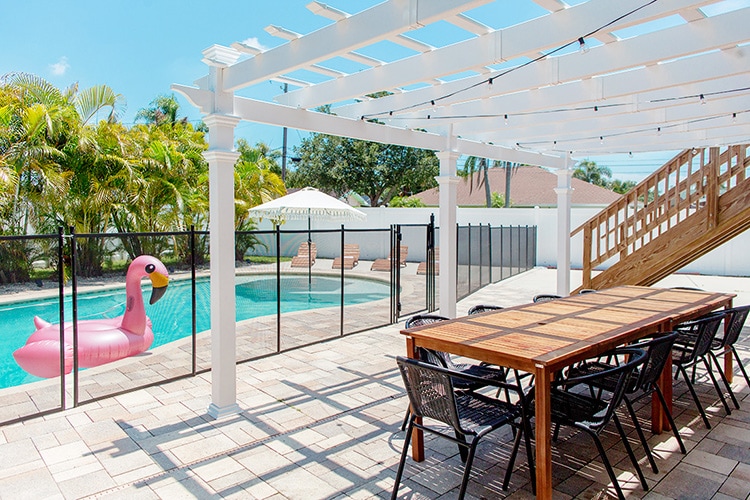
The other major change we had to make was installing a baby fence for the pool, which is required by law for short term rentals here (a lot of people skirt this law, but it was not something we’re willing to risk).
A few weeks ago before the house was finished, our property manager sent a photographer out to take a handful of photos to get the listing live, before the baby fence was installed—here’s how it looks without:
It can be rolled up and removed pretty easily and we do offer that as an option if there are no children staying at the property (no one has taken us up on that yet).
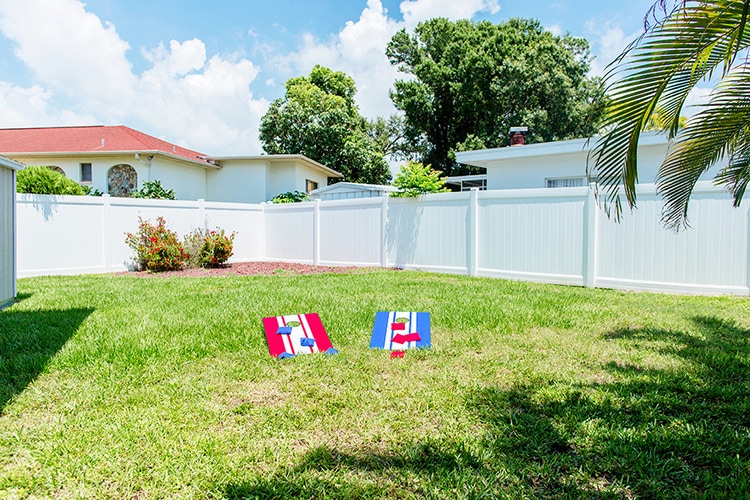
There’s also a large grassy area perfect for lawn games:
What we added/changed:
- Vinyl pergola (purchased for $990 on Amazon, currently out of stock but available here)
- Added solar lights under palm trees
- Added string lights under pergola
- Pool umbrella
- Two dining tables
- Dining chairs
- Pool lounge chairs
- Fixed the old AC unit platform/fence
- Installed a baby gate
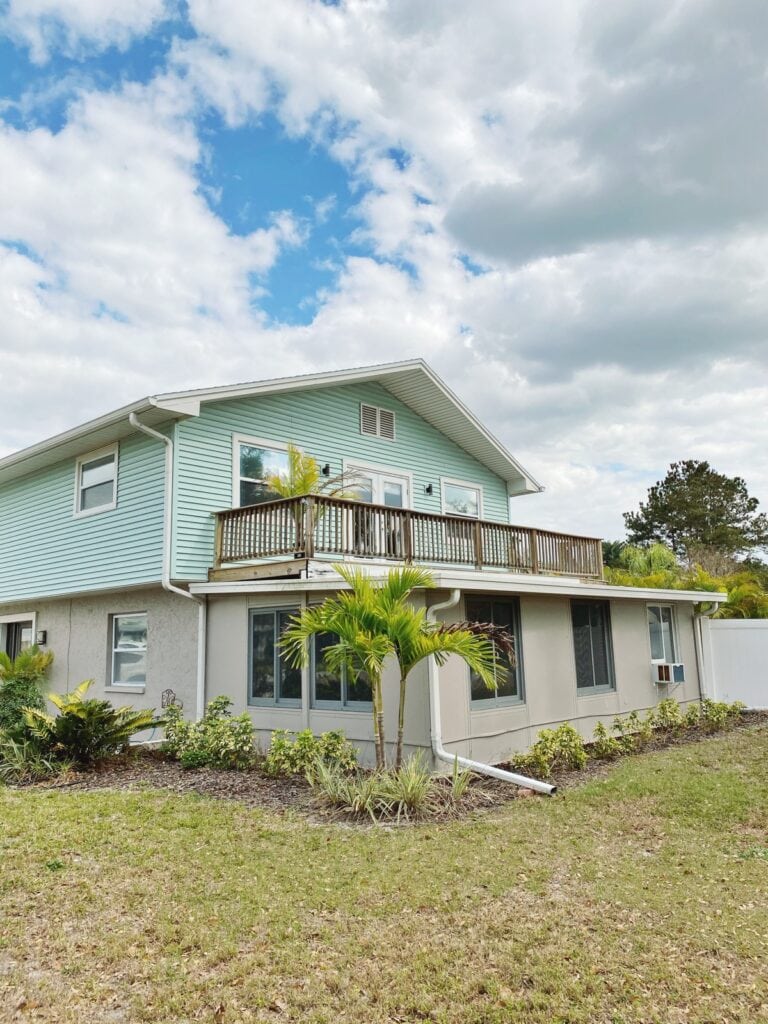
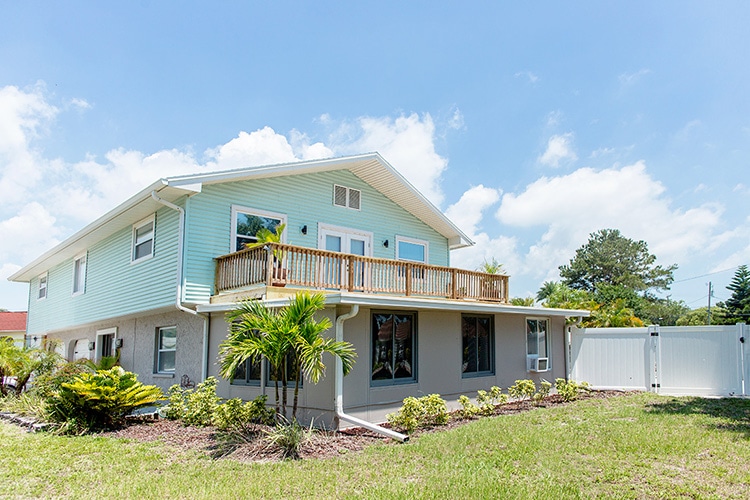
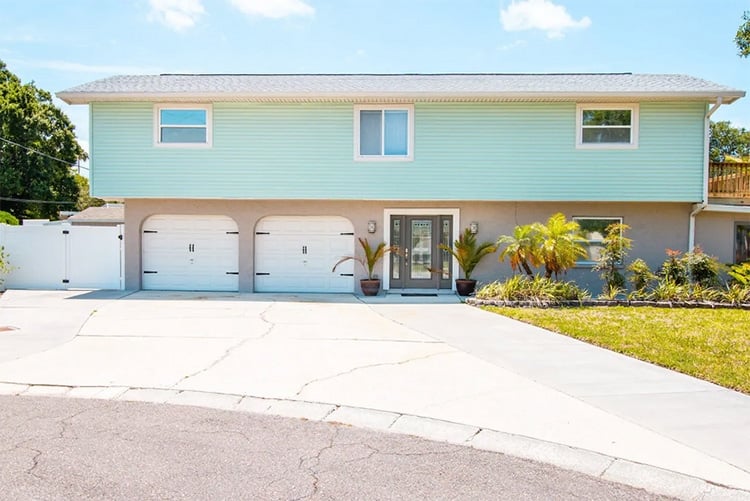
Front Exterior: Before
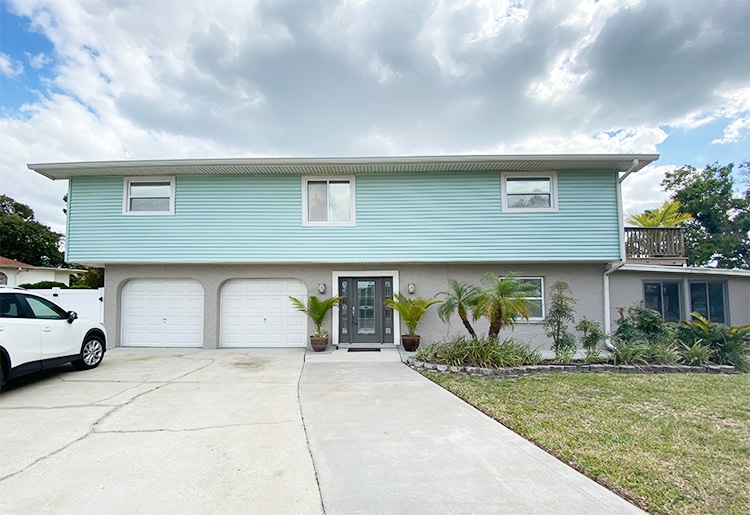
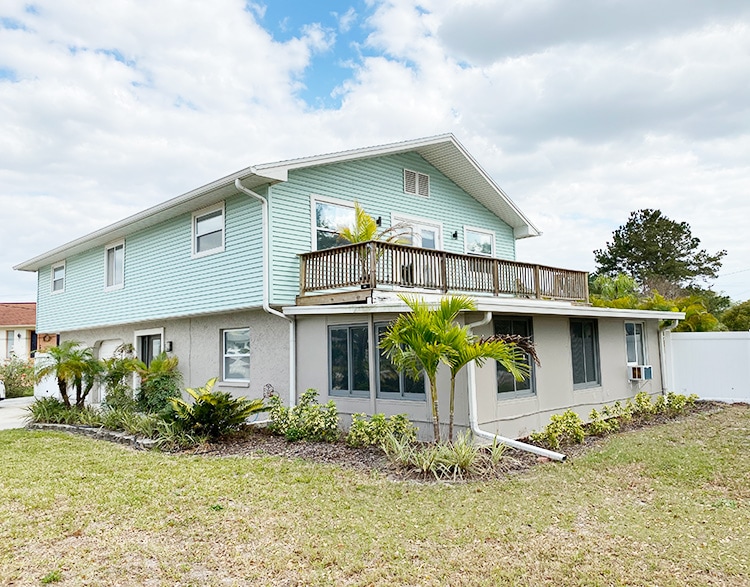
Front Exterior: After
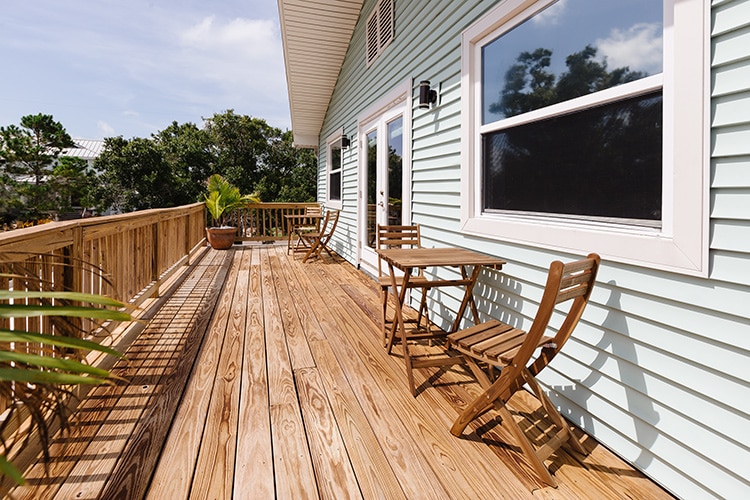
It’s hard to tell from these photos, but we repaired, sanded and refinished the wood deck off the side of the house (just off the main living room/dining area).
Here’s a closeup of the new deck off the main living area:
At the front of the house, we only made one small change but I think it’s worth sharing—can you spot the difference?
I found these magnetic garage door straps for $20 that make the garage doors look so fancy! They snap right onto the door, no drilling required! You just have to be able to trust that your neighbors won’t steal them 🙂
One day I would love to add an arbor pergola between the two levels to give the facade some depth and interest, and window shutters too. Unfortunately that would not increase our bookings and we wouldn’t get our investment back (unless we sold the house) so it probably won’t be in the cards, but a girl can dream.
Sunroom/Game Room: Before
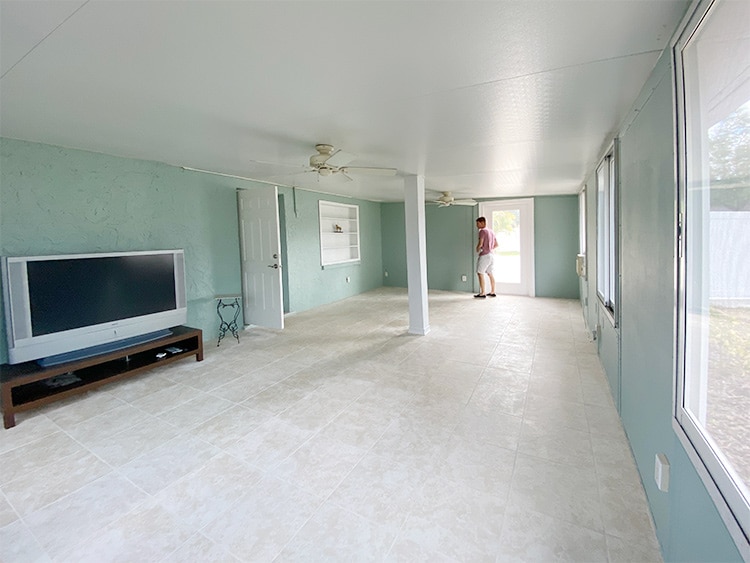
Sunroom/Game Room: After
Just off the pool deck and kids bedroom is a multipurpose TV/game/lounge room:
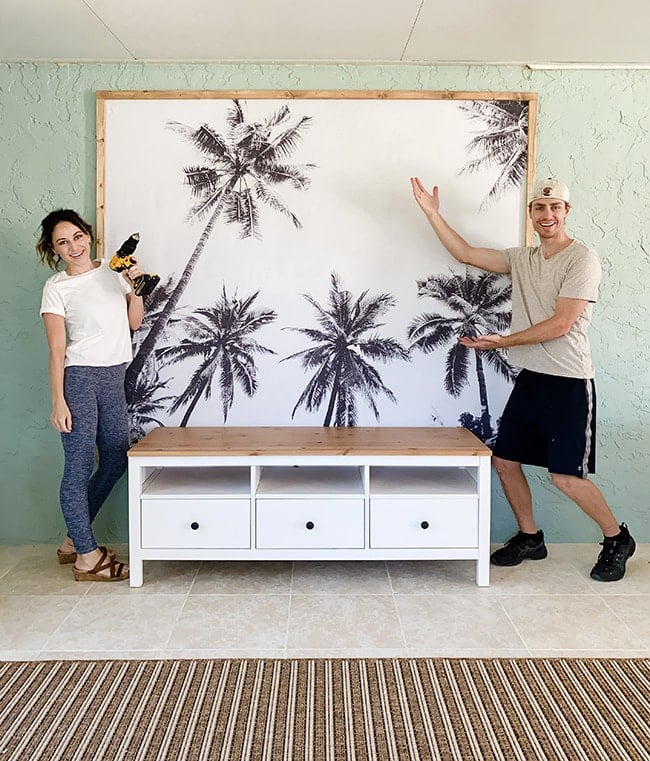
If you caught my DIY tapestry blog post, you already saw a preview of this space. The large wall art is definitely my favorite part of this room (and so inexpensive!)
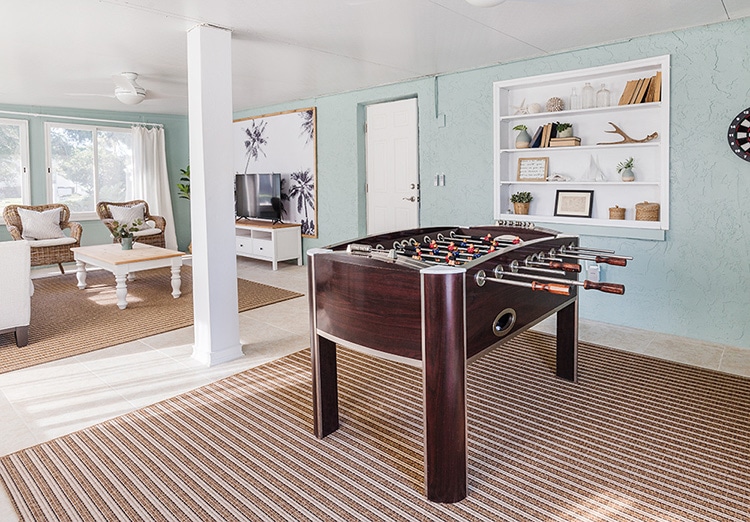
In addition to board games, we’ve stocked this room with a foosball table, darts and hookey:

This space was pulled together on a serious budget, from an empty room to a fully equipped multi-purpose hangout spot for around $1900 total.
What we added:
- New window AC unit
- Two ceiling fans
- Foosball table (secondhand)
- Darts
- Hookey
- Two 8×10′ rugs
- Sofa (secondhand)
- Wicker chairs (already owned)
- Coffee table (secondhand)
- TV stand (secondhand)
- 49″ Roku TV
- DIY wall tapestry
- 4 sets of curtains
- Shelf decor (already owned)
- Faux fiddle leaf fig (no longer available, similar here)
- Lamp + side table (secondhand)
- Curtain rods
- New door hardware
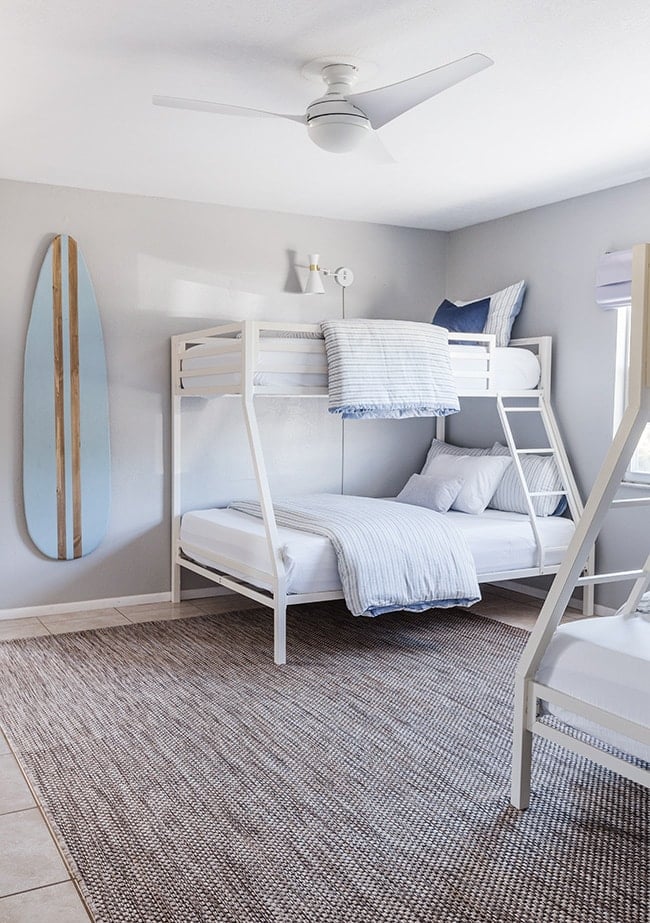
Downstairs Bedroom: Before

Downstairs Bedroom: After
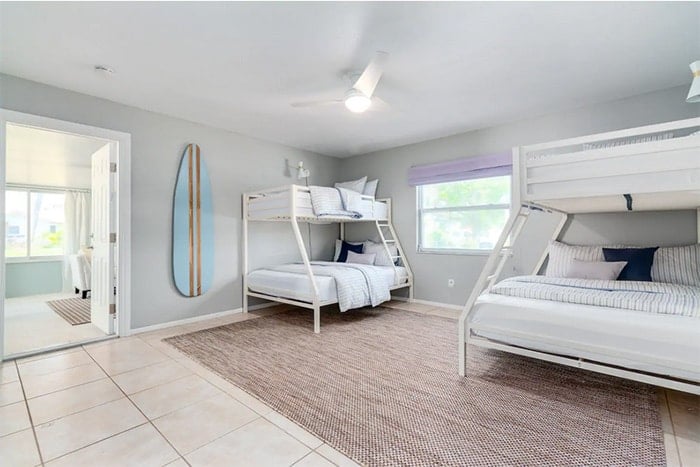
This was a fun room to design! I squeezed in two DIY projects—another large framed tapestry and a wood surfboard:
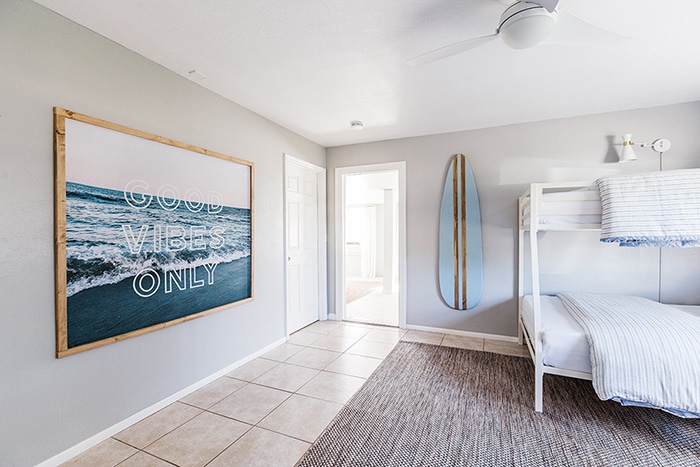
This room can sleep six people (3 per bunk) and it’s the perfect kids room setup—adjacent to the sunroom and on its own level downstairs, separated from the other bedrooms + main living spaces.
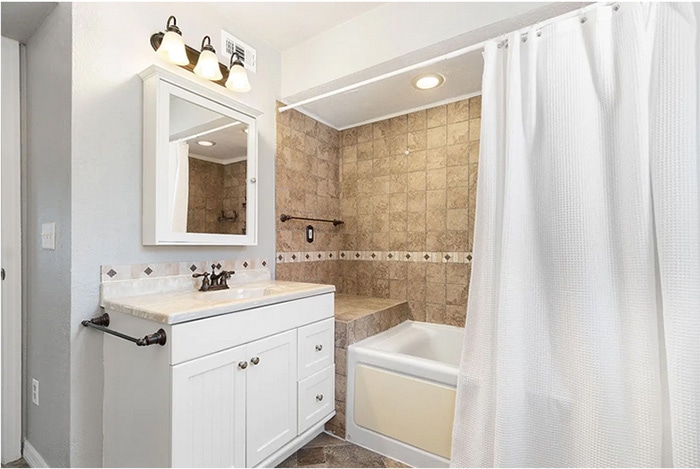
The kids room also has its’ own full bathroom and huge walk-in closet (not shown). The bathroom is definitely outdated and I’m sure we’ll end up remodeling it eventually, but for now, it’s perfectly functional and acceptable for a vacation rental.
What we added:
- Two twin/full bunk beds
- 9×12′ rug
- Complete bedding setup (w/ striped duvet sets)
- Ceiling fan
- Two wall sconces
- DIY tapestry
- DIY surfboard
- Mirror, hooks, accessories + shower curtain in the bathroom
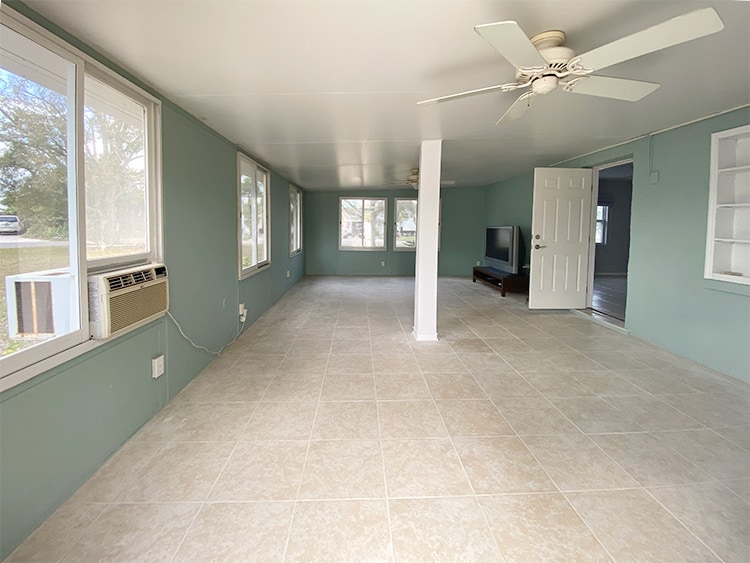
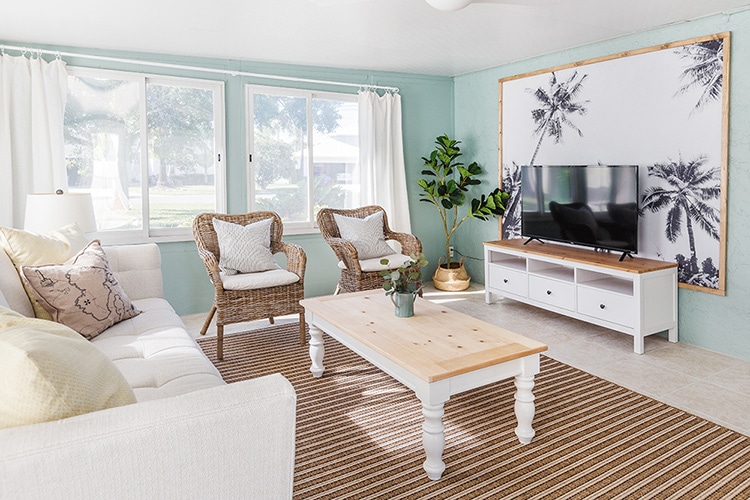
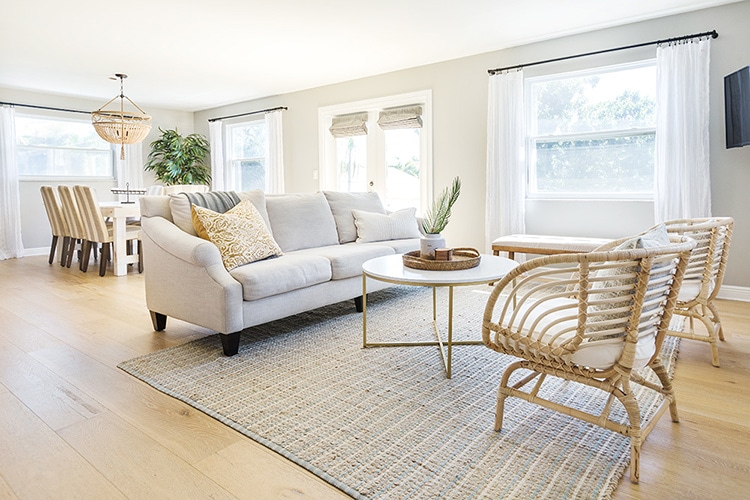
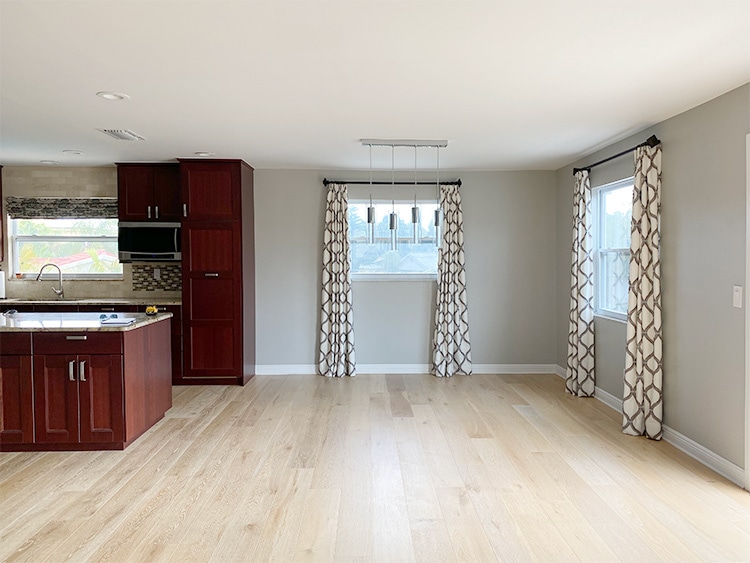
Living Room: Before
Living Room: After
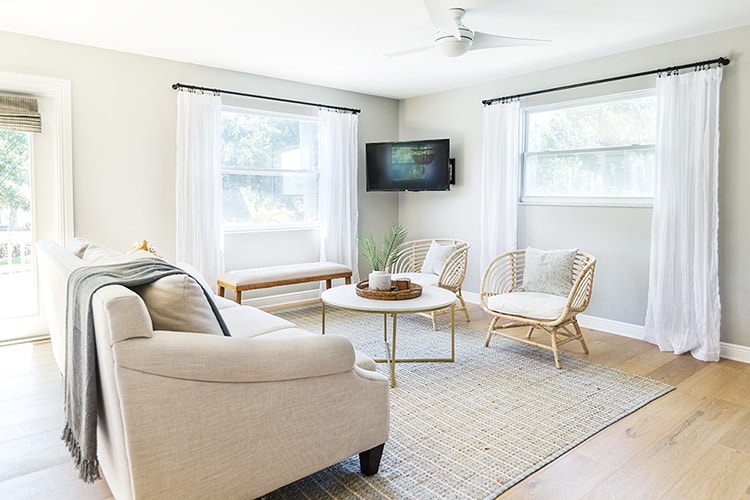
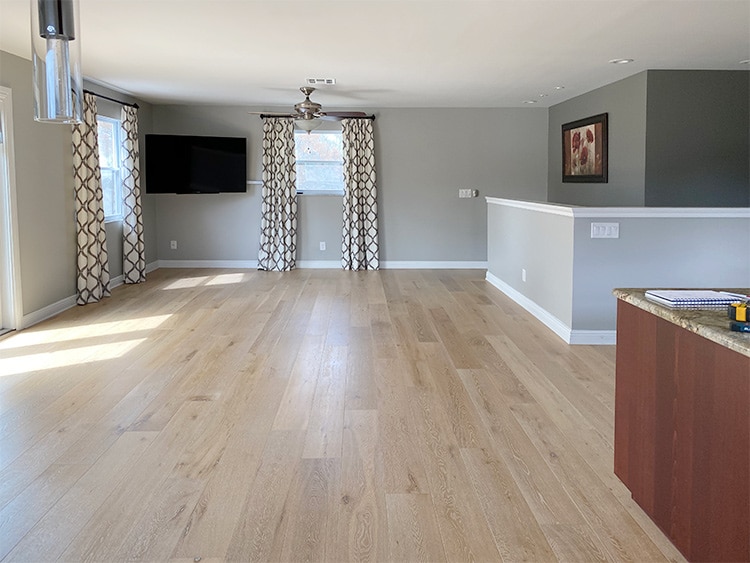
The house has an open concept living/dining/kitchen area, and there was really only one option for a seating/TV arrangement with this layout.
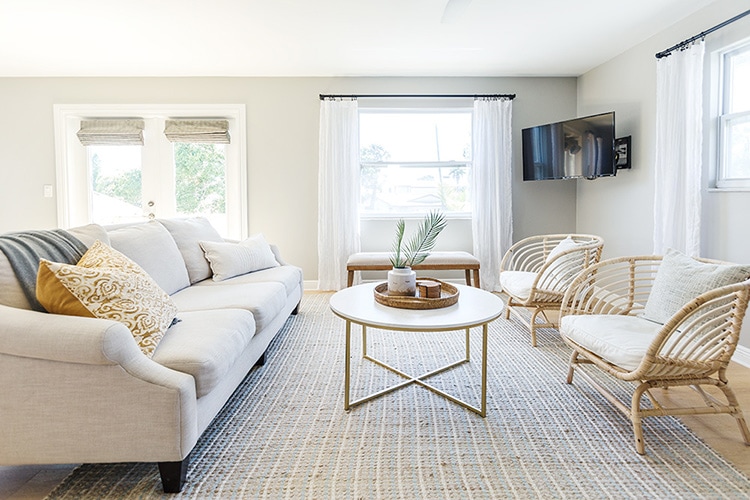
We kept the existing TV wall mount, and added a bench for additional flexible seating that wouldn’t make the small space feel too crowded. Swapping out the old heavy curtains and dark wood fans made an incredible difference in allowing the space to feel more open and airy. This whole room came in under $1700.
What we added:
- Sofa (secondhand)
- End table (secondhand)
- Wicker chairs
- 8×10′ striped rug
- Coffee table
- Upholstered bench
- Curtains
- 43″ Roku TV
- Ceiling fan
- Throw pillows
- Artwork + mirror (not shown)
Kitchen/Dining: Before
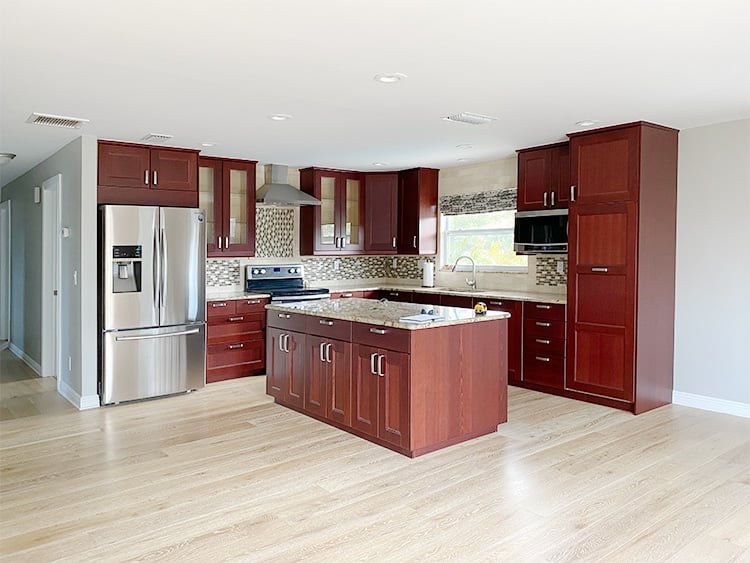
Kitchen/Dining: After
Not gonna lie, I’m not a fan of this kitchen at all. Cherry stained cabinets would be my last choice—they just don’t make sense for a beach house. We started getting quotes to repaint the cabinets, but realized it wouldn’t be wise to spend thousands on that right now, before we even knew how well this property would perform as an investment. You can expect to see a kitchen renovation at some point in the future, but for now, red cabinets it is.
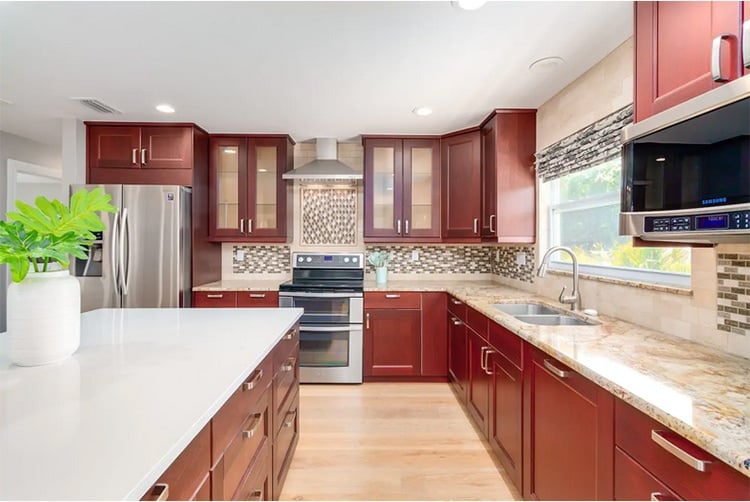
The one upgrade that we thought was worth the cost, however, was replacing the countertop on the island to include an overhang for additional seating. Our dining table seats 8 and it’s the largest size that would comfortably fit in this space, so adding 3-4 bar stools for island seating was a great option for larger parties. I opted for a plain white quartz, which will work with any future cabinet/counter/tile choice we decide on later (we were able to find a remnant to reduce the cost!)
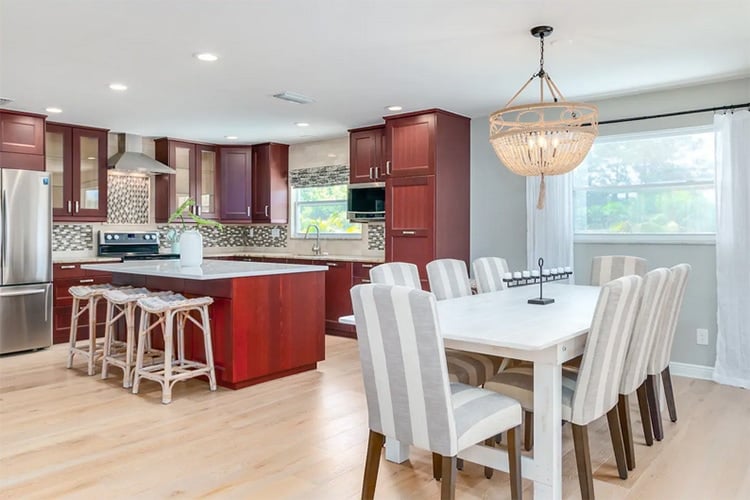
I do love the way the dining room turned out though, especially this 8′ solid wood table for only $544!
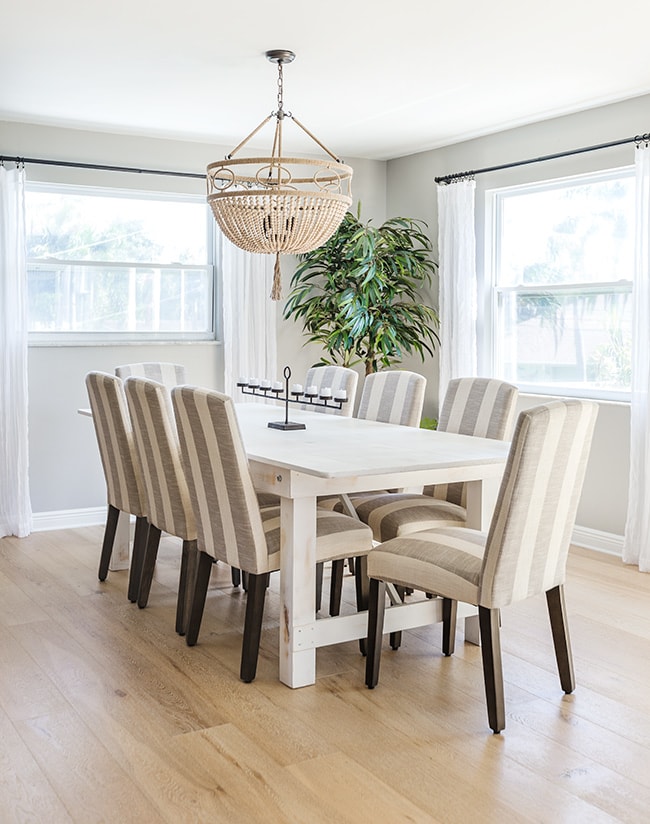
I already had four of the striped dining chairs in storage, so I just needed four more to complete the set. And the beaded chandelier is stunning in person!
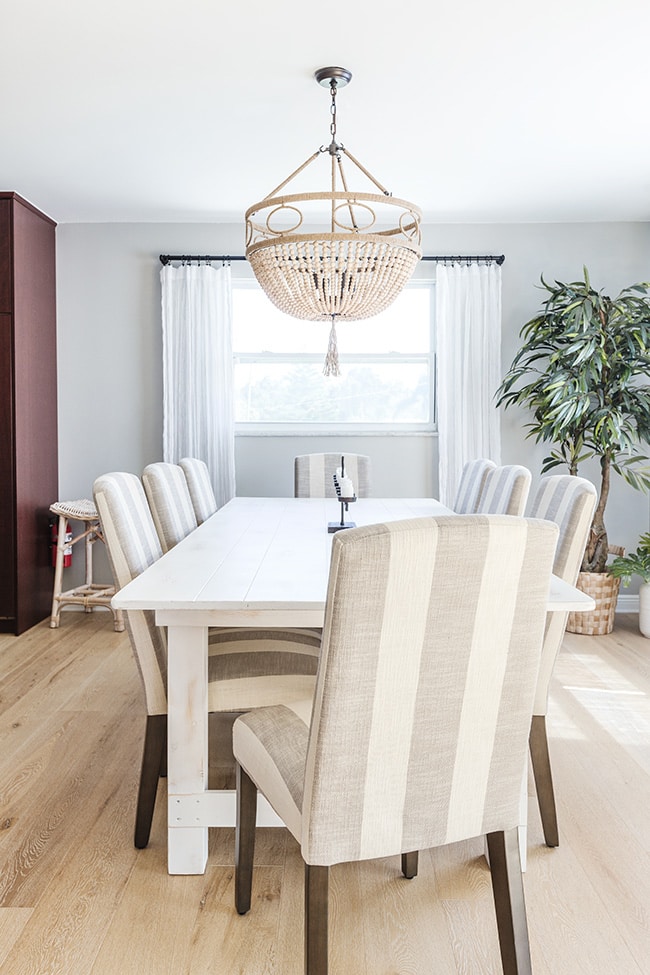
What we added:
- ‘Miami White’ quartz slab
- Wicker bar stools
- 8′ dining table
- 8 dining chairs
- Chandelier
- White curtains
- Faux palm tree (secondhand)
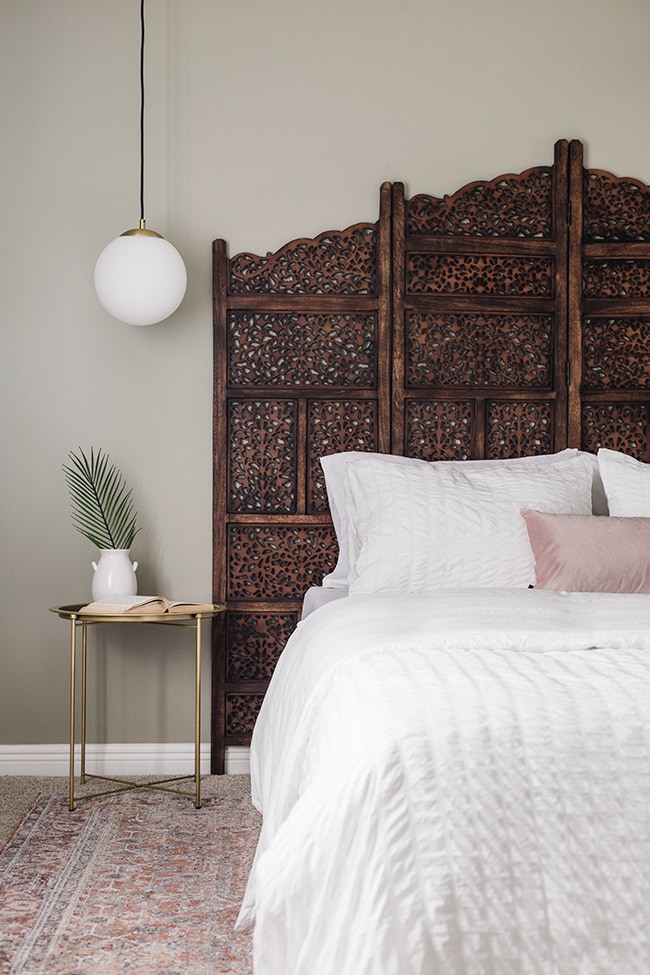
Bedroom 1: Before
Bedroom 1: After
I already revealed this room on the blog! See 1 day/$1k Boho Bedroom Transformation:
This was my personal favorite of all the rooms, mostly because of this carved wood screen divider I repurposed as a headboard.
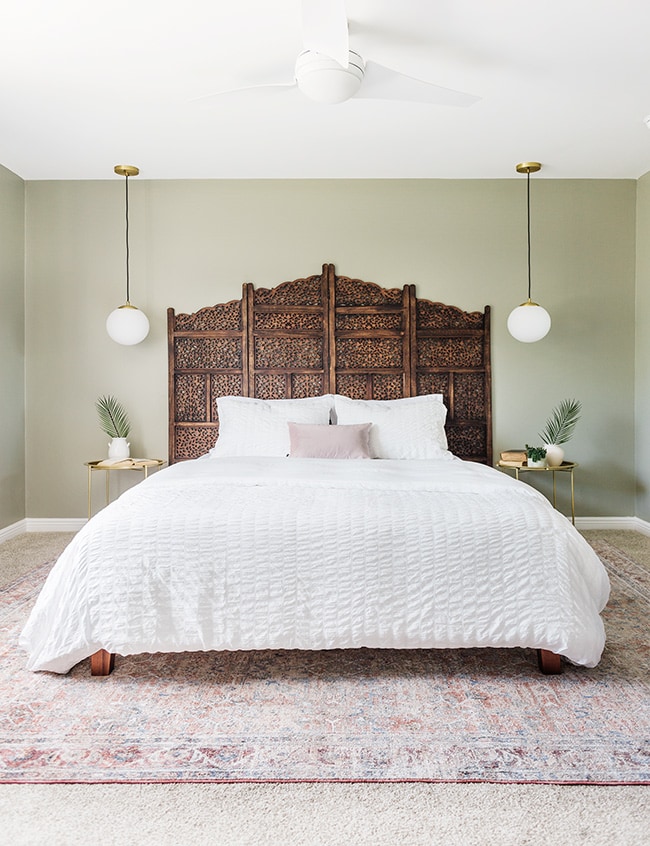
I’m also obsessed with the super soft rug, and the elegant pendant lights (remote controlled, no hardwiring!)

Make sure to check out the blog post (including a fun timelapse) to see the entire transformation we did in an afternoon, from start to finish.
Sources:
Bedroom 2: Before
Bedroom 2: After
This room was also revealed on the blog last month, in my Budget Bedroom Reveals post:
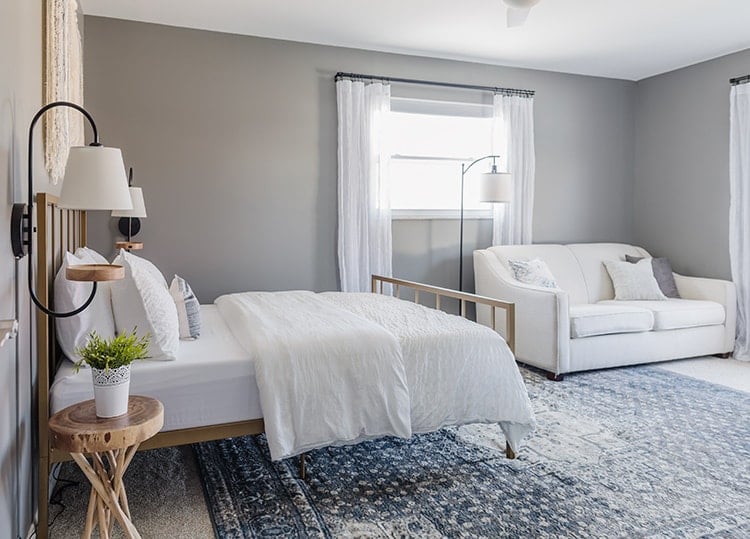
In addition to the queen bed, there’s a queen sleeper sofa so this room sleeps four.
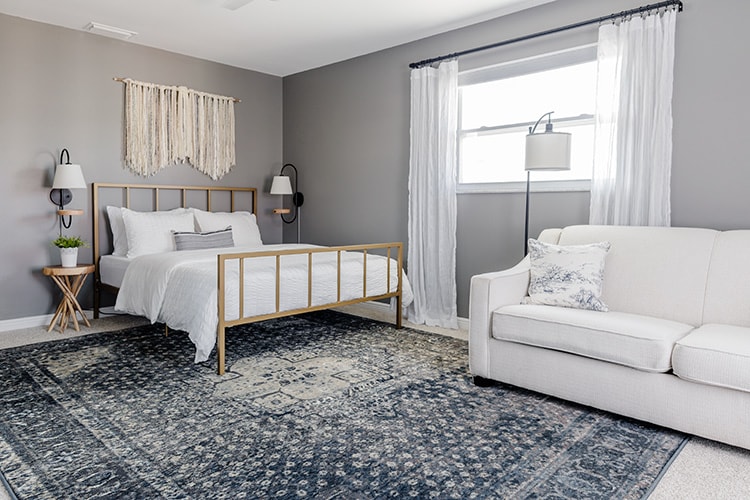
Make sure to check out the reveal post for complete design details!
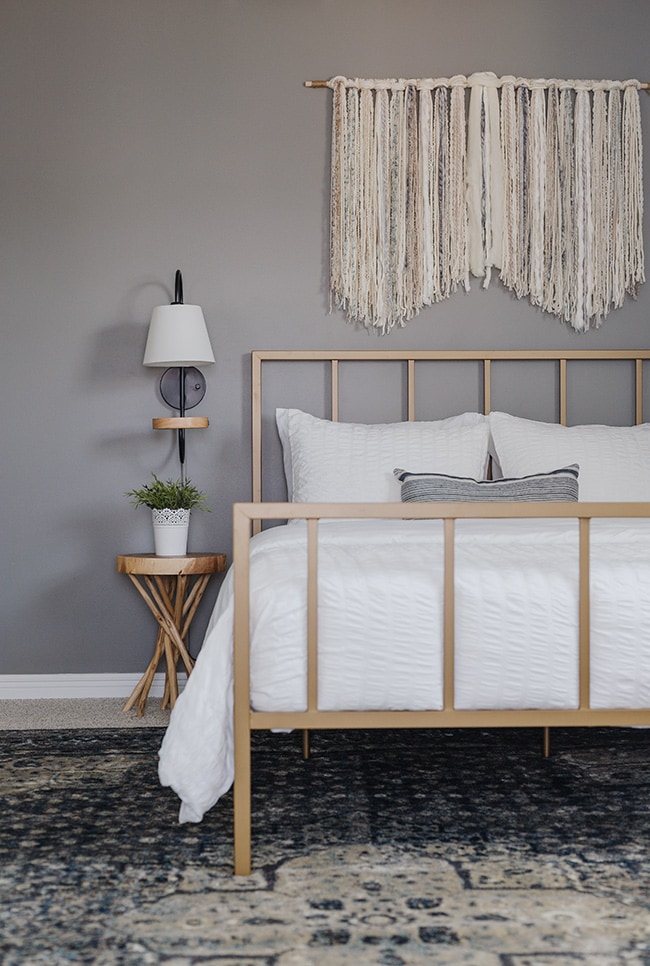
What we added:
- Queen bed
- Sofa bed (secondhand)
- 9×12′ rug
- Side table (secondhand)
- 2 sconces
- Custom tapestry
- Ceiling fan
- Bedding
- Curtains
- Floor lamp
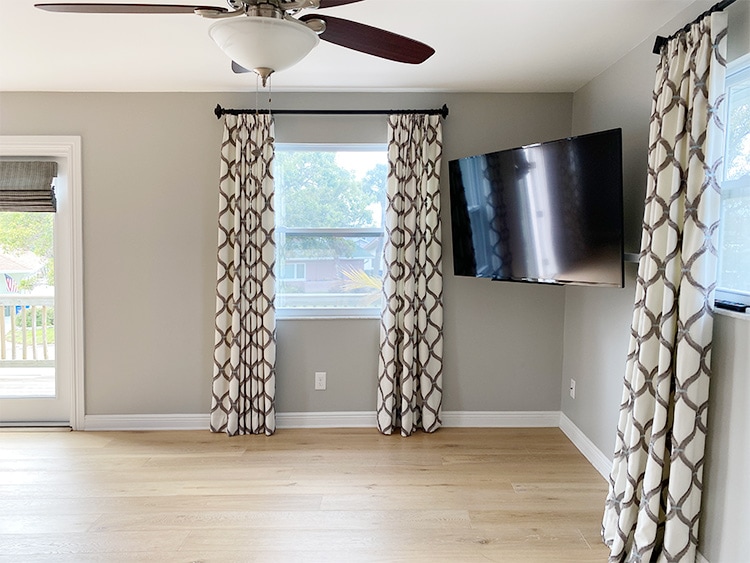
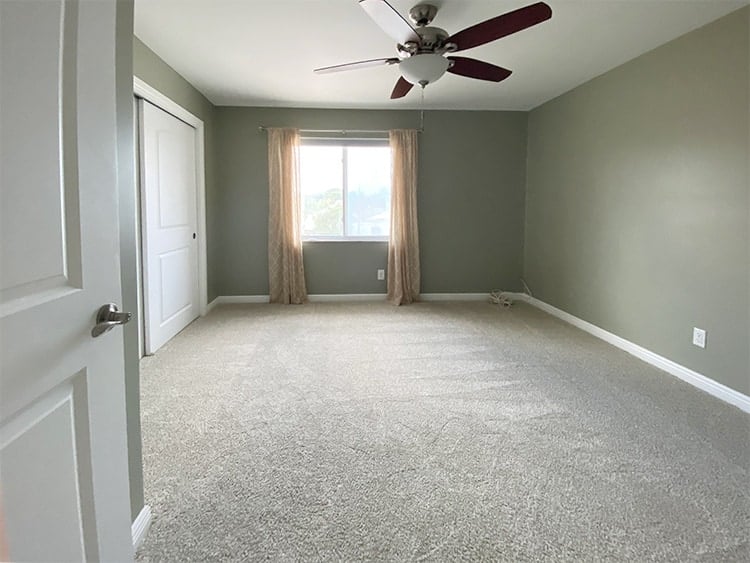
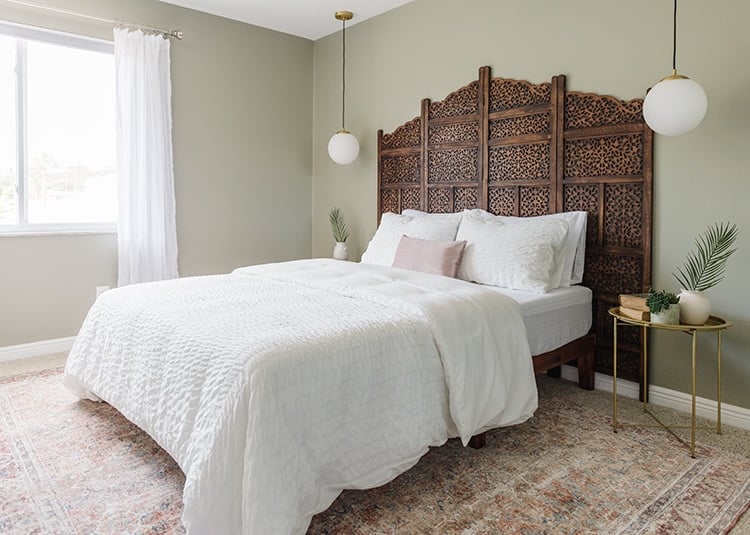
Master Bedroom: Before


Master Bedroom: After
You may also remember seeing this master bedroom revealed on the blog last month…
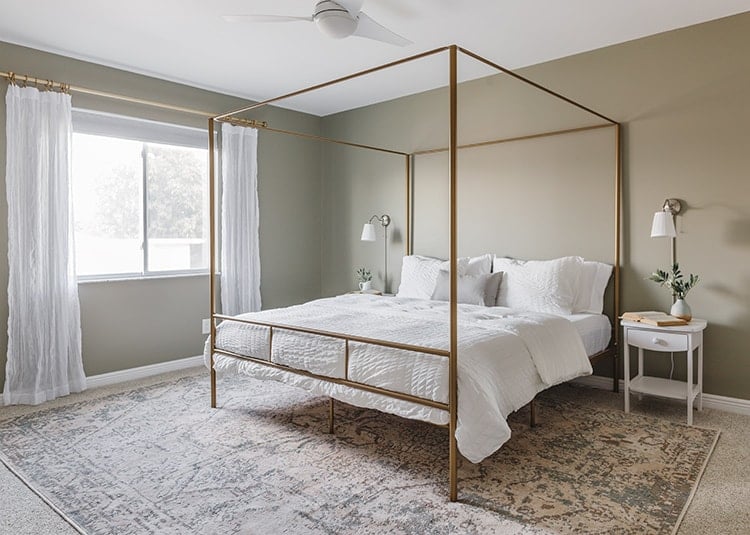
Thanks to some serious bargain hunting (the King canopy bed was the most expensive item in the room and only $268!) this entire bedroom came in under $1200, including the mattress/pillows/complete bedding.
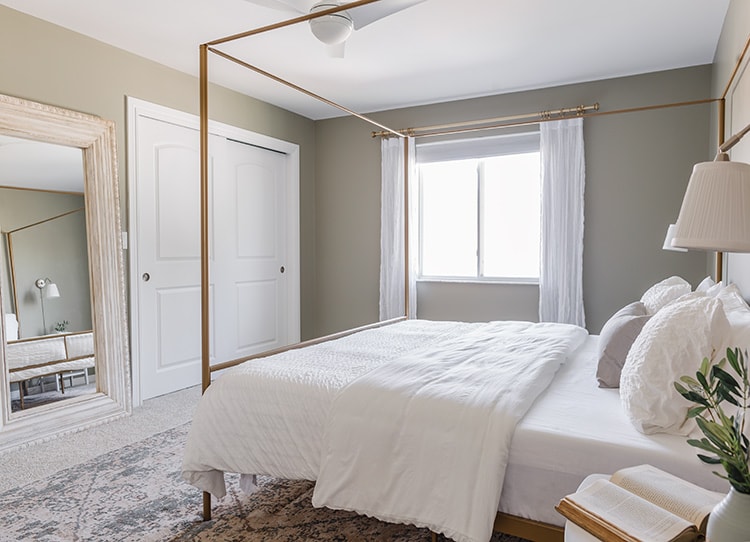
The price has unfortunately increased for many of items I purchased for these rooms, which just proves you need to jump on these deals when you come across them! Bargain hunting at this level is legitimately a full-time job, and you have to move fast.

What we added:
- King canopy bed
- 9×12′ rug
- Wall sconces
- Night stands
- Bedding
- Mirror (already owned)
- Wall art (secondhand)
- Ceiling fan
- Curtains
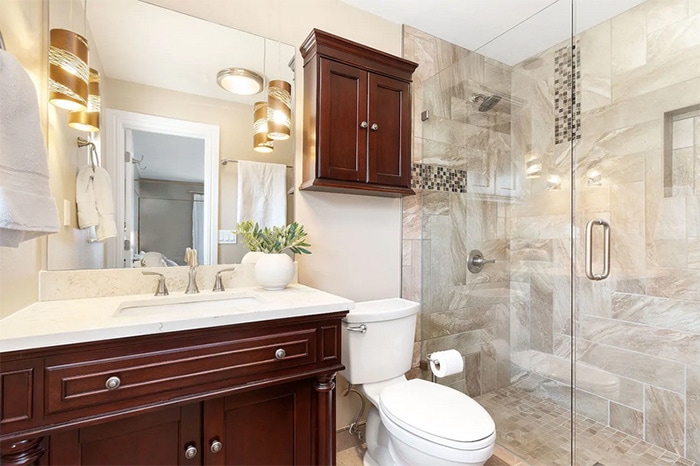
Upstairs Bathrooms
There are no “Before’s” for these rooms because the only thing I did was hang art, change the shower curtain, and add wall hooks to the main bathroom. Clearly, these rooms are not my style at all but they’ve at least been updated recently and have all the amenities a guest would want. Here’s the main hall bathroom (shared with Bedroom 1 & 2):

And the master bathroom:
Foyer
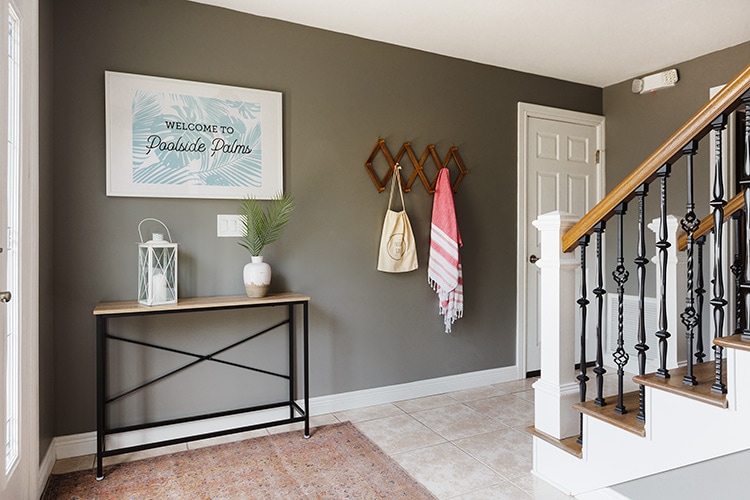
All we did here was bring in a few accessories (including a personalized Welcome sign) and changed the ceiling light. Simple, inexpensive and gets the job done!
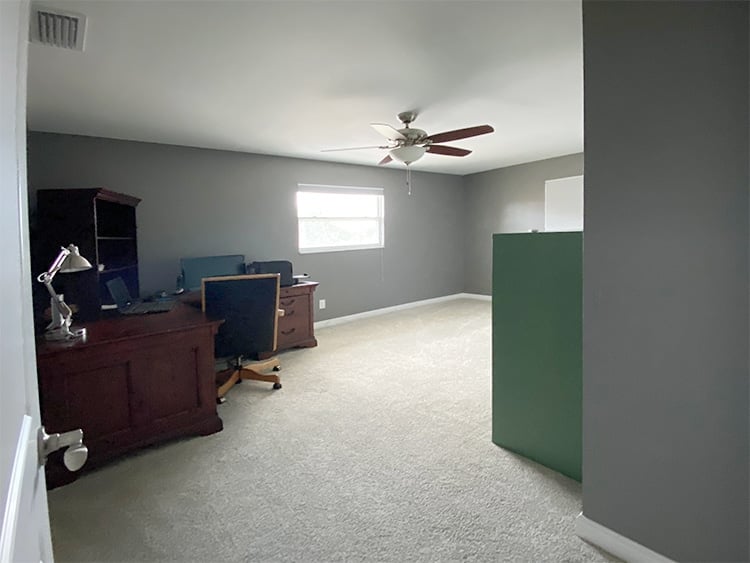
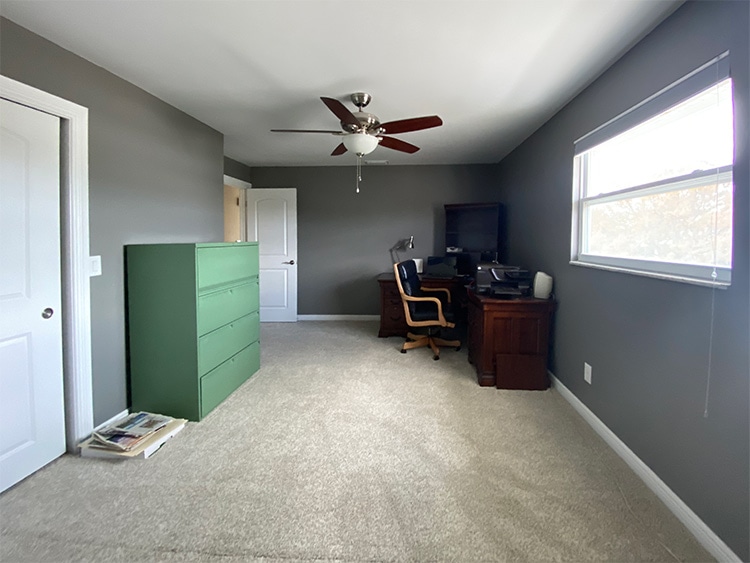
Other Rooms
There’s a small powder bath and laundry room (downstairs) that aren’t shown because they’re pretty small and we didn’t make any changes. But having that fourth bathroom and a laundry/mudroom for all the beach towels has been great for guests!
Total Cost
Now for the moment of truth… how much did it cost to get this AirBnb up and running?! Last night we sat down and added it all up for the first time, and it turns out we had both underestimated the startup costs (isn’t that always the case, though?)
We kept a spreadsheet during this renovation and tried to be as diligent as we could, so this should be pretty accurate, but there were also countless trips to the hardware store for random things that surely fell through the cracks. With that said, here’s our breakdown:
Construction/labor: $6,700
This includes all jobs we hired out installing the pergola, refinishing the deck, installing a new AC platform/fence, pool fence installation, kitchen island counter, electrical work and miscellaneous repairs.
Furnishings/décor: $14,800
This covers everything to fill a large 4 br/3.5ba house from scratch, including all of the furnishings, bedding, textiles, electronics/games, hardware, lighting, décor—ALL OF IT!
Bath/Kitchen Supplies: $2,100
This includes everything to fully stock a kitchen (pots/pans, dishes, utensils, small appliances) and all bathroom linens, towels, etc. It also includes extra sets of bed linens required for turnovers, beach towels, beach chairs/toys, and misc. supplies like trash cans, hair dryers, vacuum, pack ‘n play, luggage racks, etc etc. Everything was purchased from Amazon, Ikea, and Big Lots.
Grand Total: $23,600
If you account for any miscellaneous purchases that slipped through the cracks, we can safely say our total startup costs came in at or under $25k. If the house was completely turn-key and we didn’t need to make any repairs or construction work, it would have been well under $20k. For a large house (with a big backyard) that sleeps 14, I think that’s pretty good! As I go back through the list now, I honestly don’t see anything I would have done differently.
The biggest expense was the backyard (pergola, refinishing the deck, pool fence, furniture) but those were necessary and/or worth every penny. We purchased brand new memory foam mattresses for every bed, which was our biggest furnishing expense but comfort is a non-negotiable (and these beds are soooo comfy!)
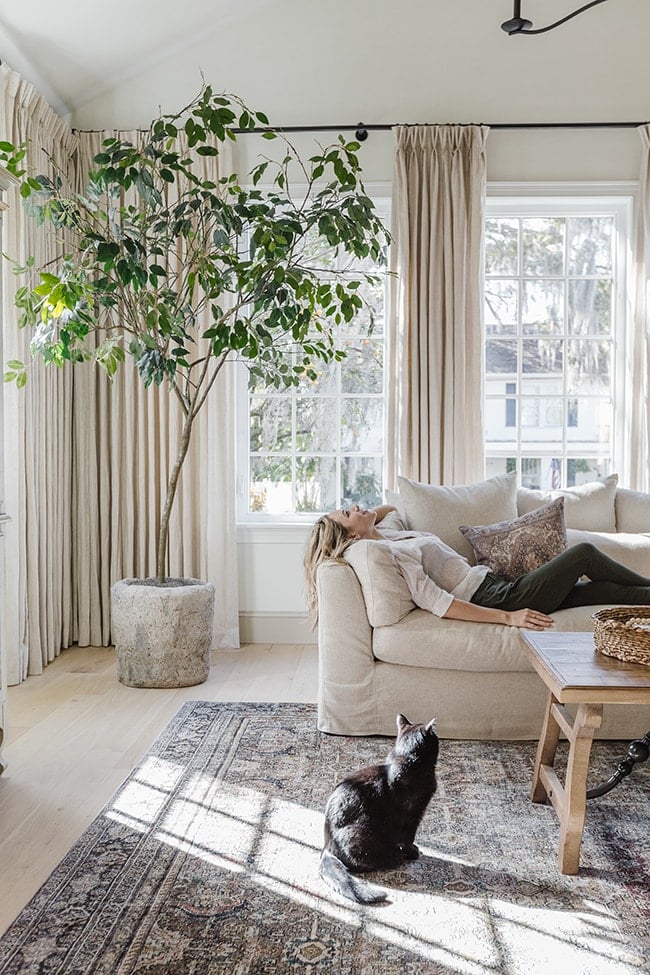
And there you have it, our Poolside Palms BnB! I hope you’ve enjoyed following this project, and if you find yourself in need of a beach getaway, we’d love to host you! The house is just a few miles from our favorite sunset spot on the gulf, and less than 20 minutes away from the #1 beach in America…

You can book a stay via this link. If you have any questions about the process, sources, our experience or anything else, just let me know and I’d be happy to answer!


Melissa Barronton says
Do you have an Instagram for this one or just the Riverside Retreat? I’d love to follow
Along if you do but didn’t see it under Poolside Palms.
Jenna Sue says
Hi Melissa, thanks for checking! There is no IG account for Poolside Palms. Maybe one day though 🙂
Karen says
Oh my gosh, I lost you for a while for some reason but I’m glad I’m back on track. While I thought you were missing due to the Pandemic you were two were plugging along with yet another new project. You did such an amazing job with everything. I was thrilled to see what you did as my hubs and I recently purchased two one bedroom cottages that we intend to rent. They need a little work and I was amazed to see what you purchased on your budget. I liked so many things. One that really caught my eye were the remote control pendents that don’t need to be hard wired. GENIUS!!!! I’d love to hear more about your journey as vacation renters.
DANA DIEHL says
Love it, Jenna! Wanted to let you know the Airbnb link in your last paragraph isn’t working.
Jenna Sue says
Thanks Dana! The link was changed so I’ll go update that now 🙂
Rebecca says
Wow! This reveal is truly amazing! Love how beautifully it all came together, and SO impressed with the way you kept to a tight budget. My only odd question is how did you get all of the FB Marketplace stuff transported? Do you have a truck, or did you rent one for a day and run around an pick everything up at once? For those of us looking to have a similar experience with possibly owning vacation rentals, give us even more details! Thanks!
Jenna Sue says
Thank you so much, Rebecca! Glad you love the final result. We are fortunate enough to be able to borrow Lucas’ parents truck. But last year we bought an SUV with a tow hitch and planned to purchase a trailer, before we knew we would be able to use their truck. That’s a good alternative if you don’t have a truck and we may still end up doing that in the future!
Rebecca says
Great idea, re: the trailer. I hadn’t thought about that option! So glad I asked!! Thank you!
Vanessa says
Well done Jenna and Lucas!
Al says
Wow, it all looks great, not sure how you afford to do it all. I wish you great success with it.
Jenna Sue says
We’ve been working hard & saving up like crazy! I appreciate it Al 🙂
Danna says
Great job! Looks very relaxing. I would love to stay here!
Good luck with renting and your guests.
Jenna Sue says
Thanks Danna, I hope you can make it down here one day! ?
Monica says
This looks great – having recently worked on a rental, I found this information helpful!
Jenna Sue says
So glad it was helpful Monica!
Susan says
Just beautiful, inside and out! Clean, fresh, uncluttered and very welcoming at the same time. Thanks for sourcing the particulars too. All the best and I wish you well!
Jenna Sue says
So glad you like it Susan! I appreciate the nice comment 🙂
Pat says
Love everything you two did to get this home up and running…you never cease to amaze me!!
Funny that a couple things you mentioned is what I’d do too if money wasn’t an issue. Darn budgets?
Jenna Sue says
Thanks Pat! I would have fun renovating if this was our own house to live in or a flip — there’s a lot of potential here! Oh well, I have enough projects to keep us busy at our house 😉
Darcy says
What an amazing job you and Lucas have done! On a tight budget and a tight timeframe! Every room is beautiful!
I have a Vietnamese screen like yours that I have used as a guest room headboard for years. I love it too!
Jenna Sue says
Thank you Darcy! The wood screen idea is one of my favorite repurposing ideas!
Florence says
Beautiful job, as always. Gorgeous furnishings, but uncluttered. Looks very refreshing!
Jenna Sue says
I appreciate the kind words, Florence!
Linda Grubbs says
Oh wow Jenna! You guys did an amazing job!
It looks great. As you said… it’s not your usual style, ( but hey it’s a rental) and still stylish, safe, clean and comfortable. I’d stay there in a heartbeat if we were traveling!
Congrats to you both on another winner!!!
Jenna Sue says
Thanks so much Linda! We’d love to have you if you ever come to Florida! <3