Introducing the next big project at the Heights House… our bedroom closet!
If you caught my 2020 Project Plans post, you knew this project was coming—and today I’m ready to share all the details and plans. Starting with how it looks now…
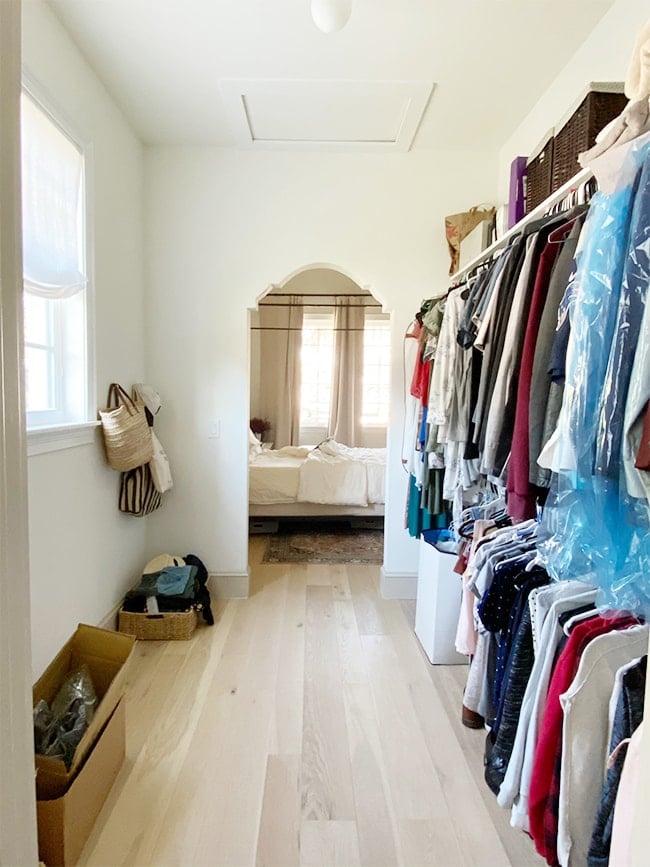
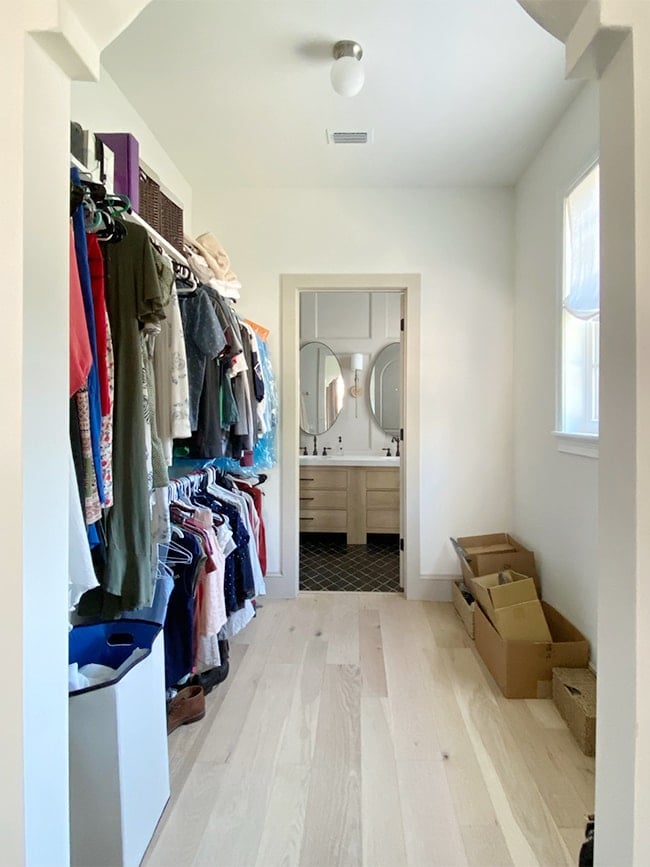
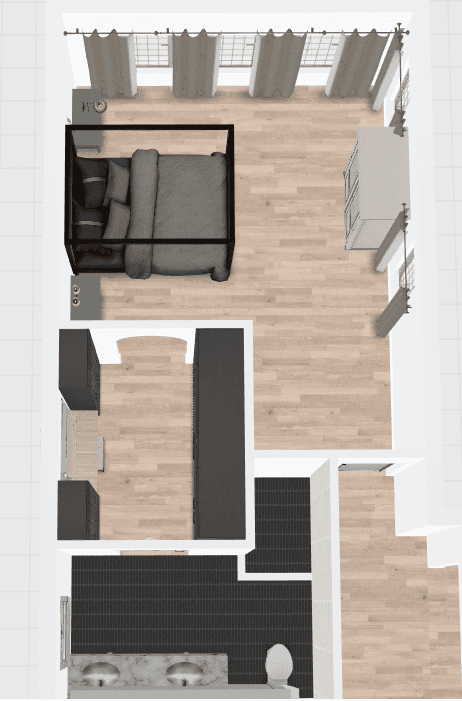
Our closet is a walk-through hallway setup, connecting our bedroom and bathroom. It’s not a very large space—measuring around 8’6″ long and 7’6″ wide (just enough room to hang clothes on either side).
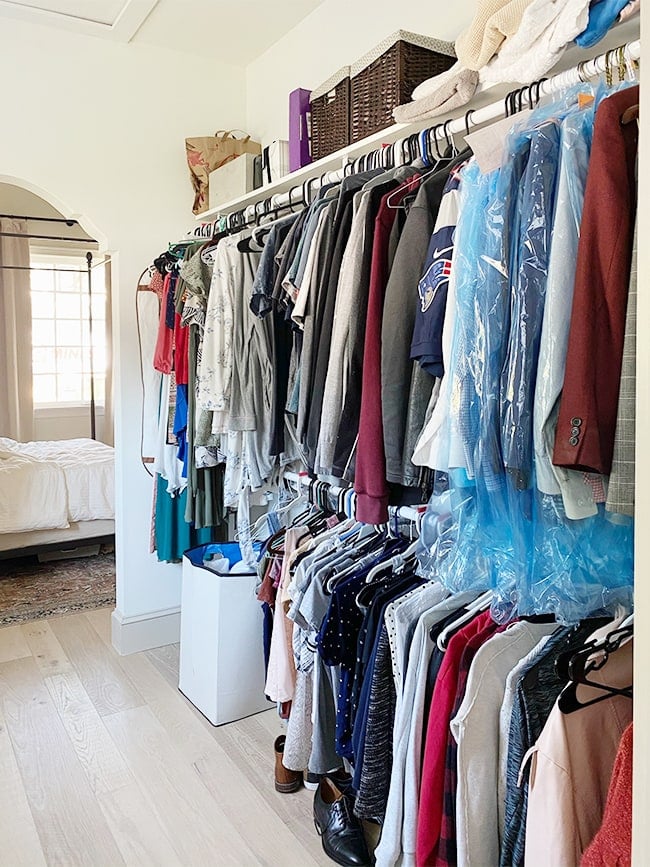
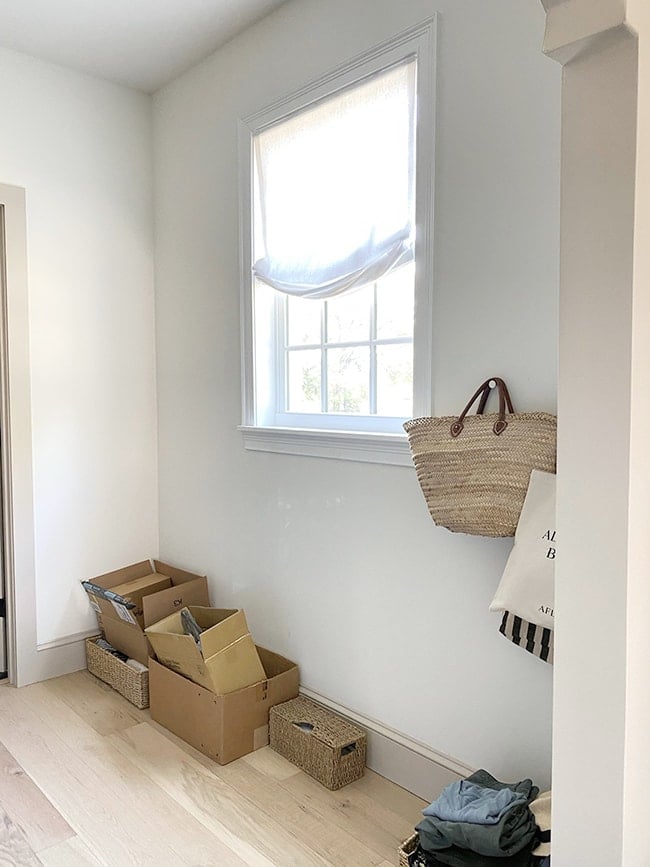
When we first moved in 1.5 years ago, we installed a basic, inexpensive closet rod system as a temporary solution. Along the window wall, we threw a few baskets/boxes of random closet stuff on the ground and they haven’t moved since—ha!
Here’s the layout of the space we’re working with:
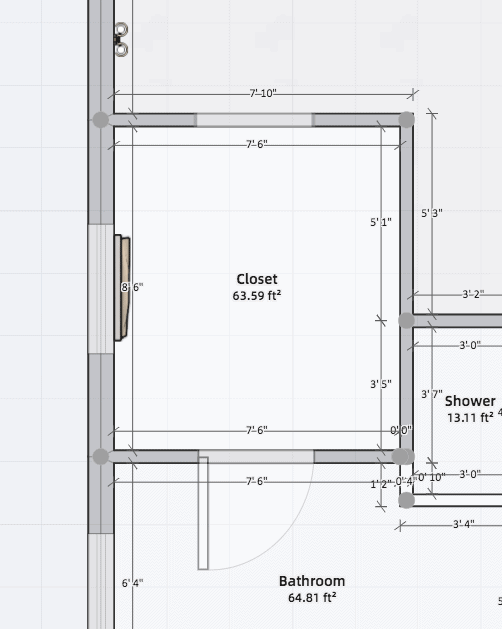
I would have loved to make the closet wider when we built the house, but that would have created issues in the adjacent spaces (specifically the shower size and bathroom configuration) so it is what it is!
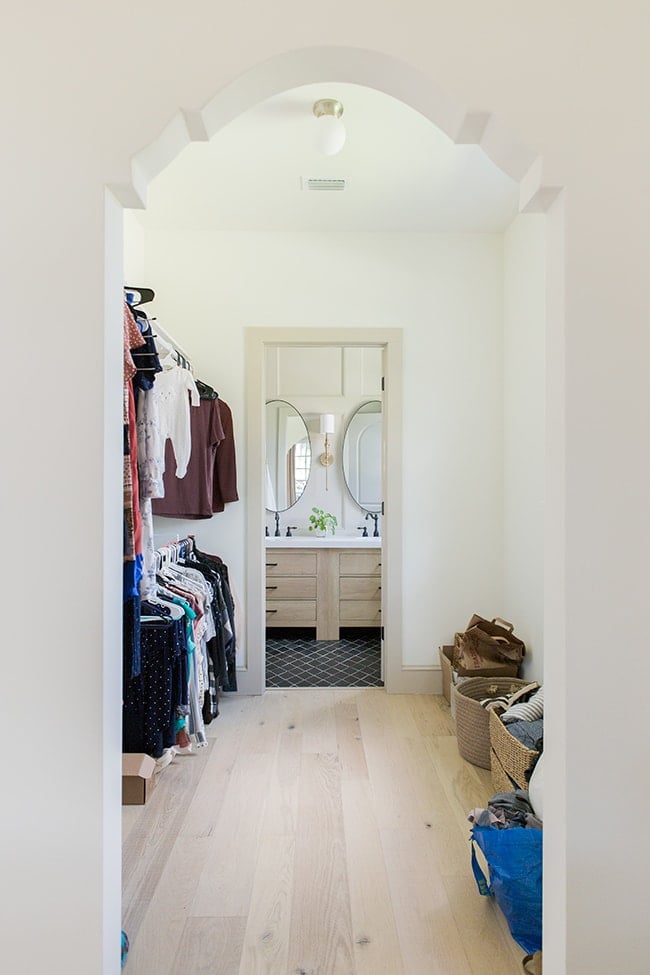
The original plan was always to add built-in wardrobes on both sides of the closet. When gathering design inspiration, I create a Pinterest board for each room to organize my ideas. I’ve been saving closet inspiration for 2+ years and it has been key to guiding the style and direction of this space. Here are a handful that stand out:
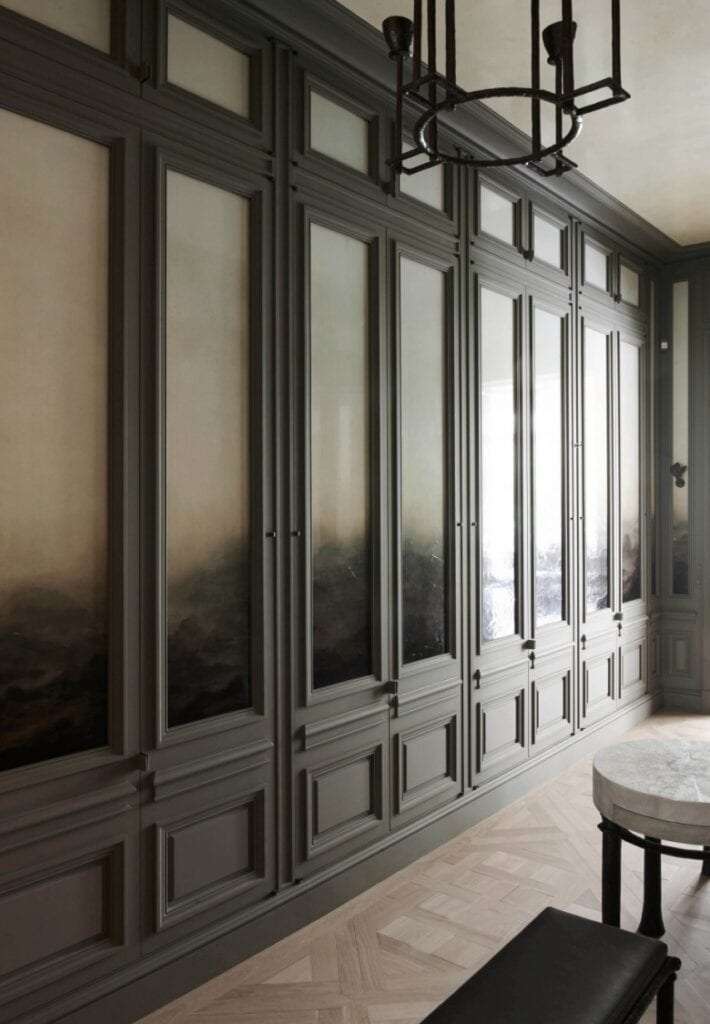
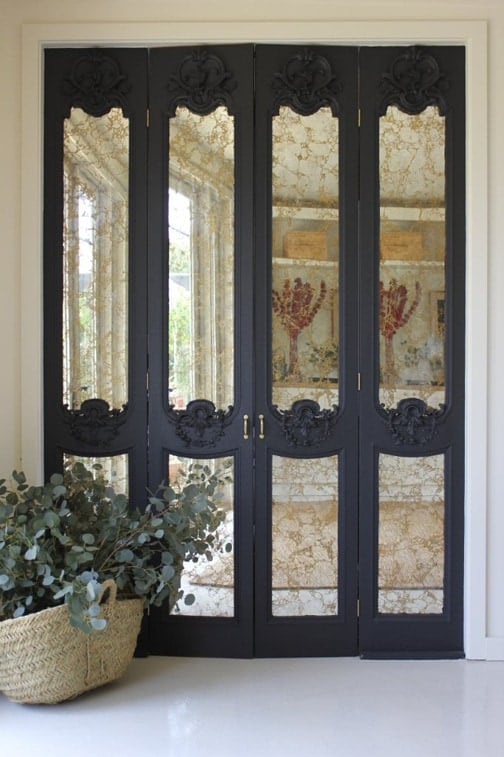
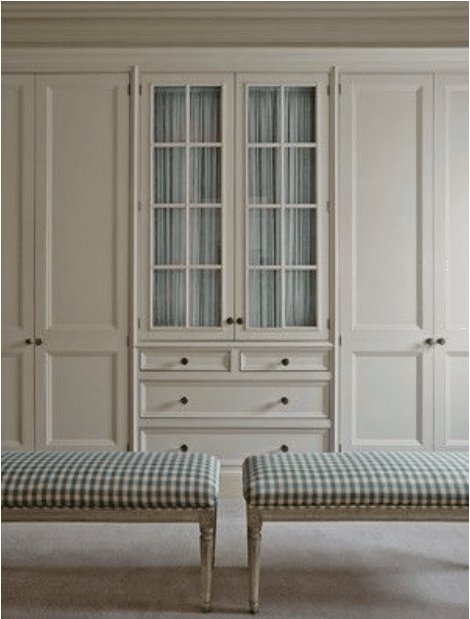
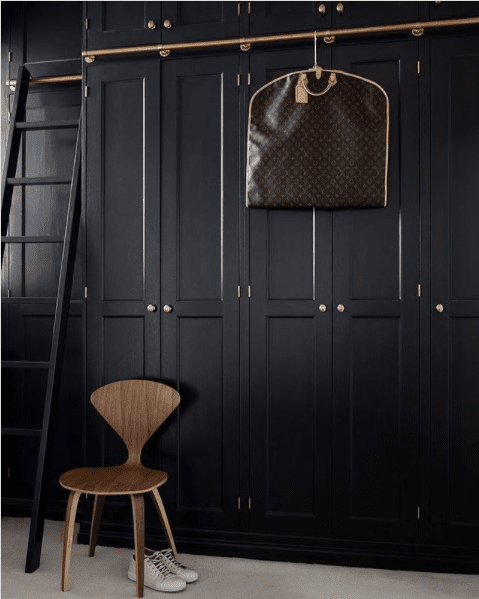
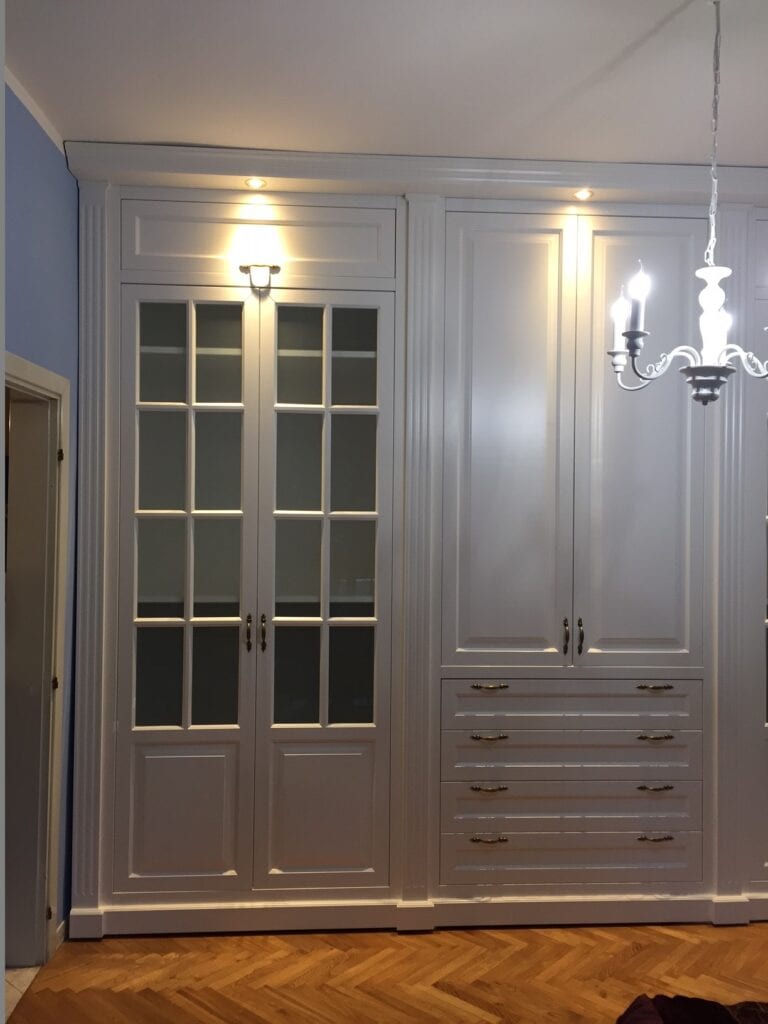
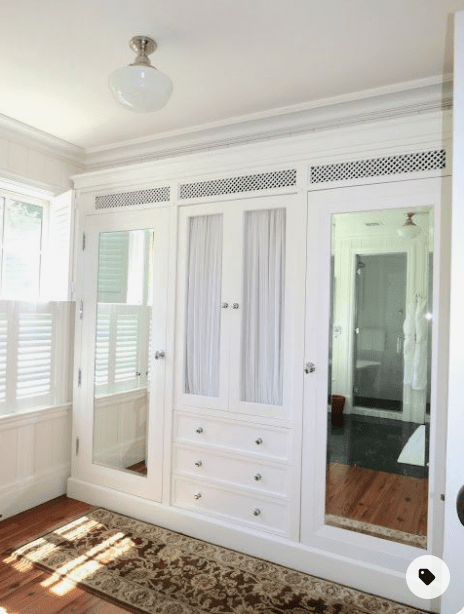
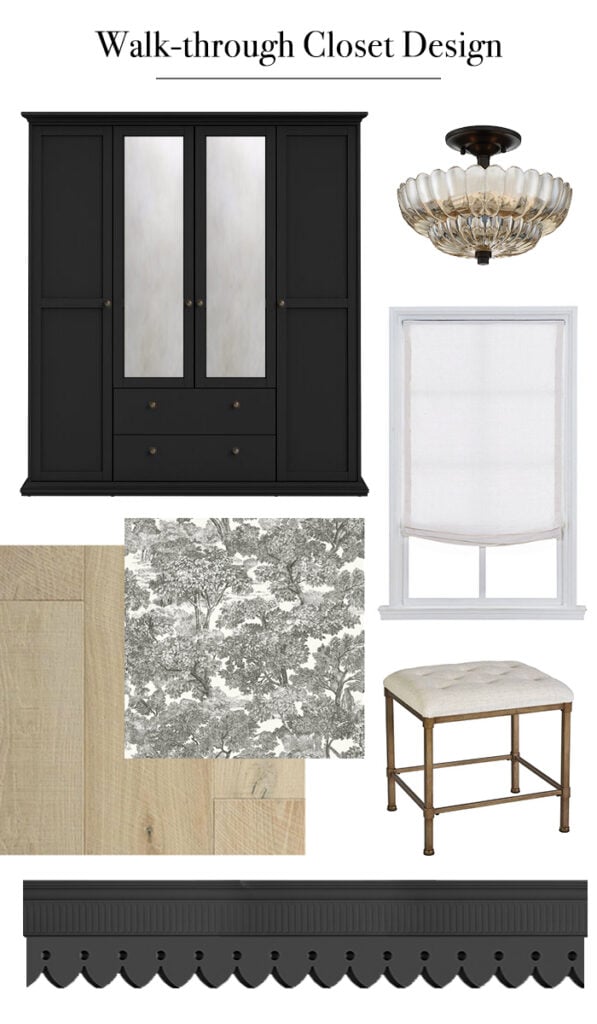
Traditional, elegant, sophisticated and striking is what I’m aiming for—which means a lot of custom work and attention to detail. Here’s what I’m envisioning…
First, I had to figure out where to start with those cabinets. Naturally I looked into customizing Ikea kitchen (Sektion) cabinets with Semihandmade doors again, but the shaker doors weren’t tall enough for what I wanted so that was off the table.
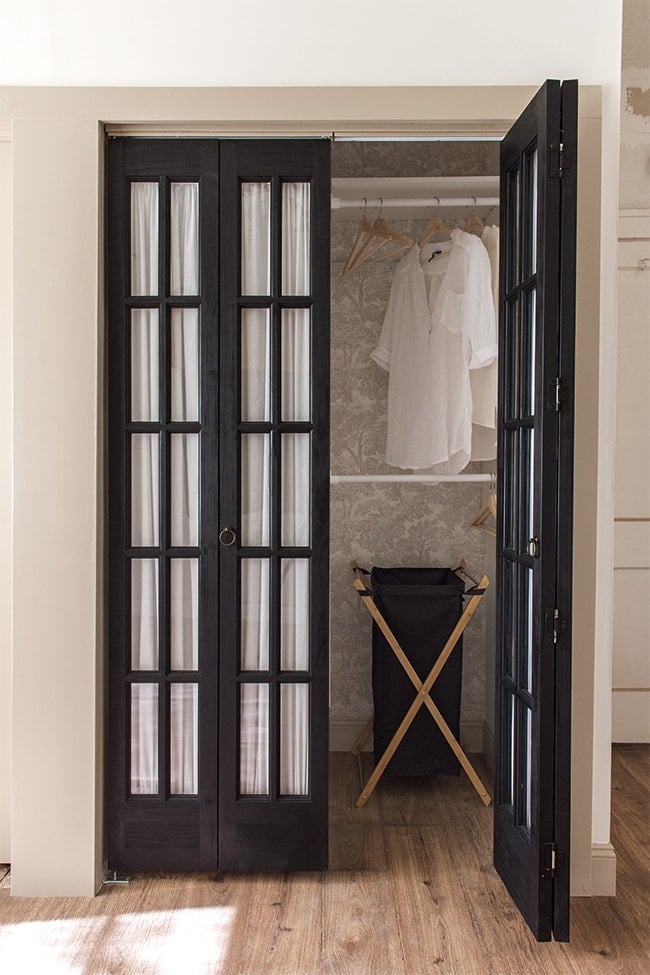
Then I looked into purchasing closet doors separately and building a frame to attach them like we did in this room, but that wouldn’t give us the exact look or functionality I had in mind.
I looked all over for pre-fabricated wardrobes we could customize to fit, but none were the right size and all very expensive.
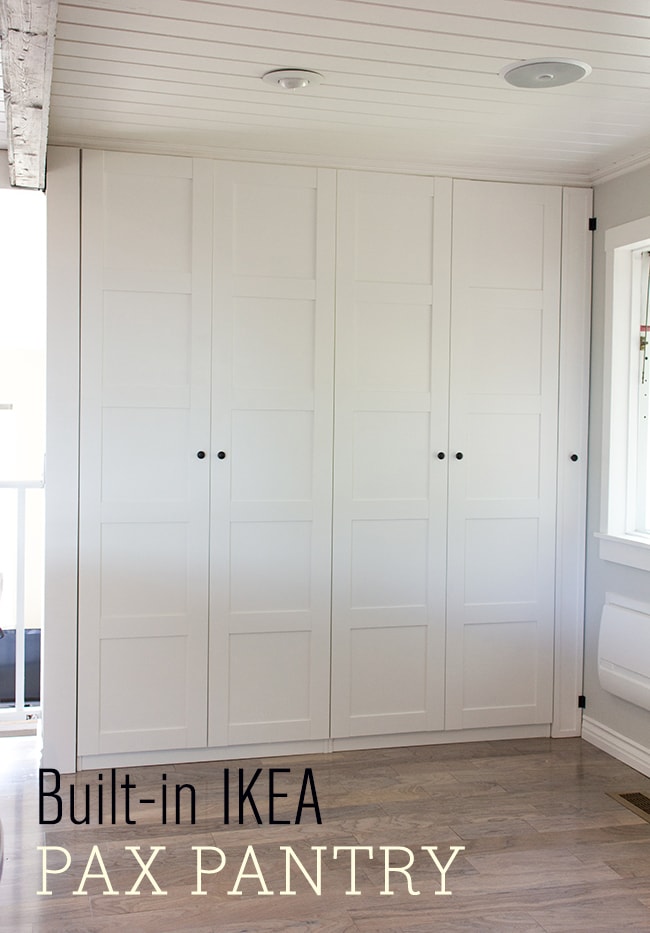
Finally, I settled on the idea of Ikea Pax wardrobes, which seems to be the most popular choice for DIY closets. I’ve used Pax several times in various houses—remember my DIY pantry back in 2014?
I felt pretty confident these could work in this application, however the product options are extremely limited. Unlike Sektion cabinets, Pax is only available in a few sizes, and the door selection is really bad (they don’t even make doors for their 40″ wardrobes!) so I knew I’d have to use custom doors.
I briefly considered the idea of making our own doors from scratch, but quickly nixed the thought after realizing how perfectly precise and square every piece must be when you’re dealing with 1/8″ gaps all around. We are nowhere near that expert carpentry level!
So instead, I researched every option I could find for aftermarket Pax doors and landed on a company called The Cabinet Face. They’re a smaller Colorado-based company offering custom door and drawer fronts for Ikea kitchen, bath and closet systems. I reached out to talk through my ideas and see if they’d be able to/wanted to work together on it, and they agreed—woohoo! Here’s the plan:
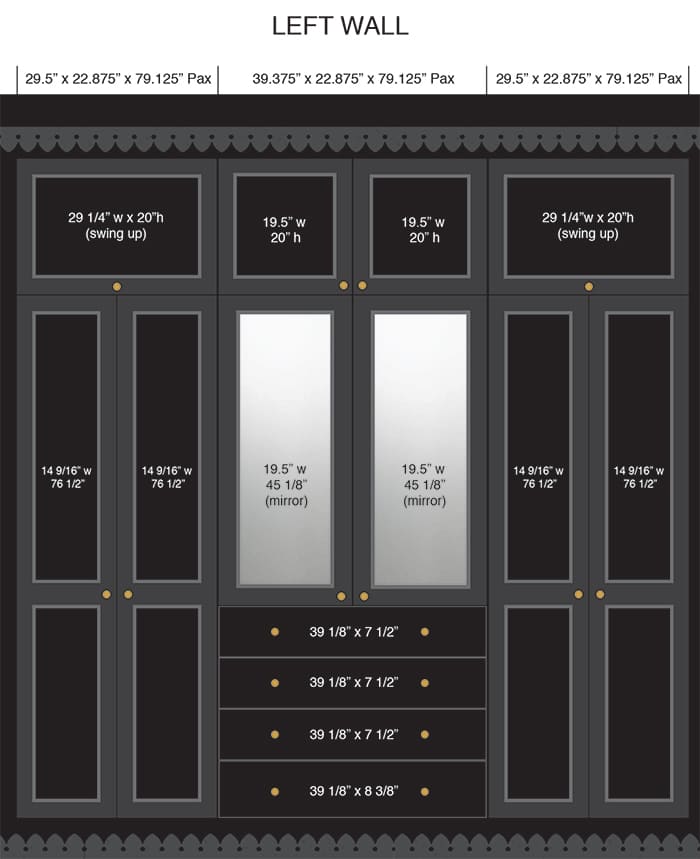
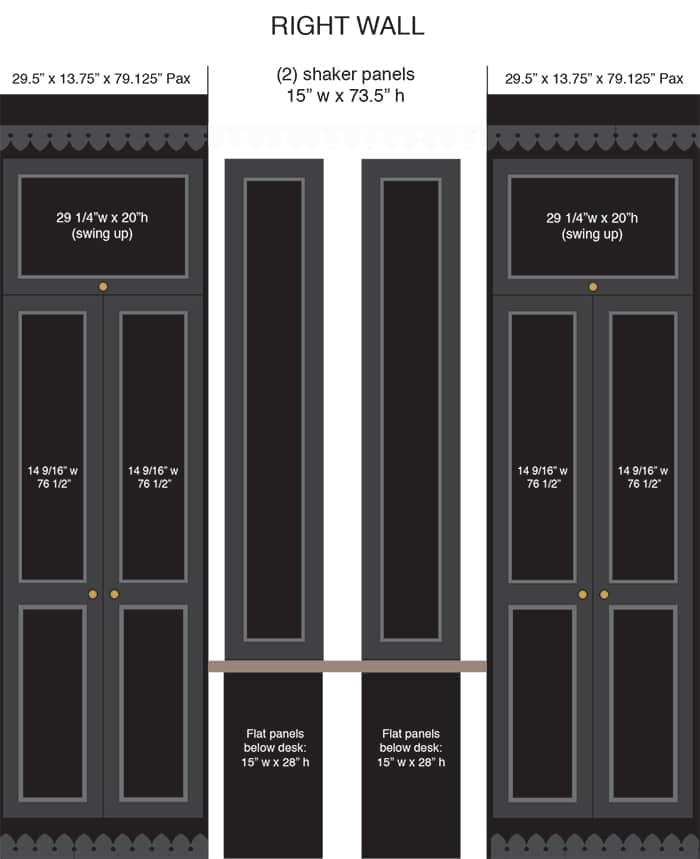
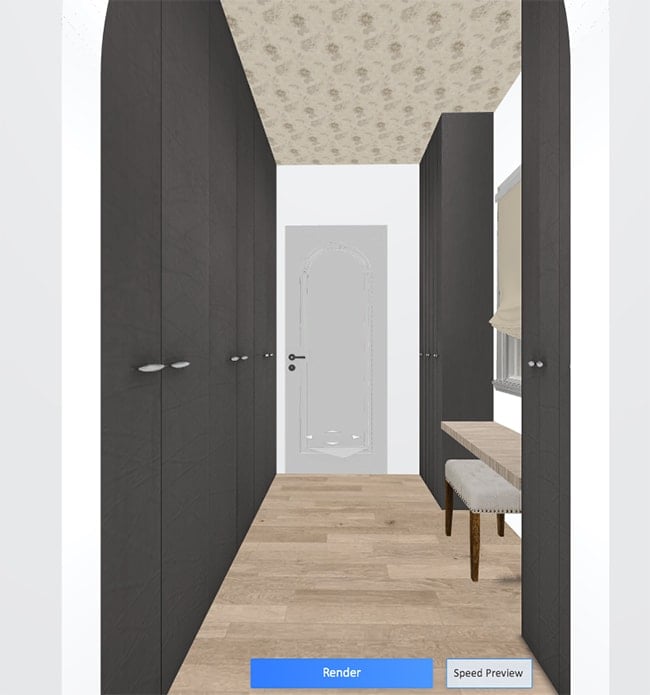
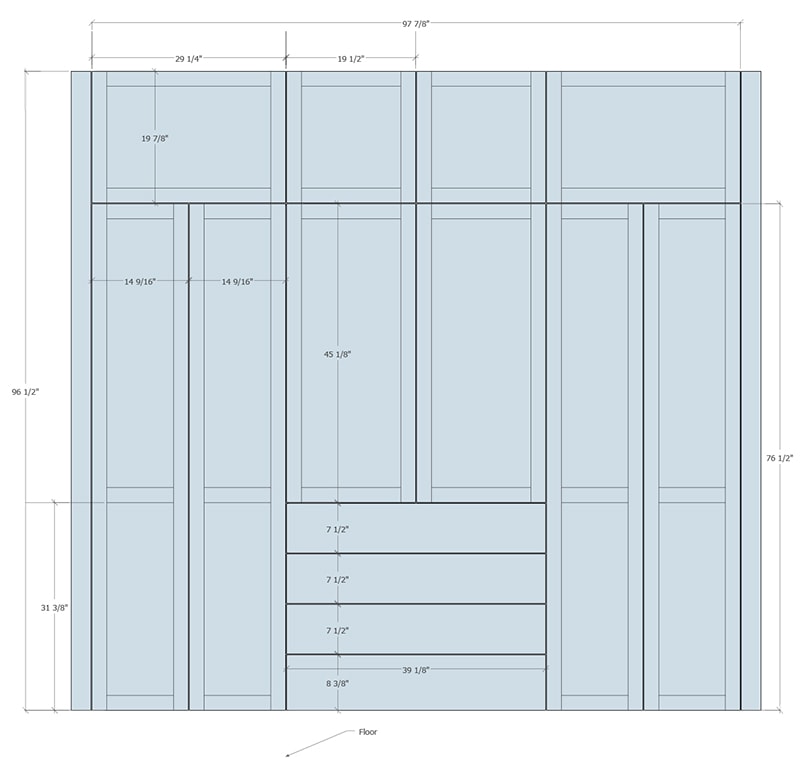
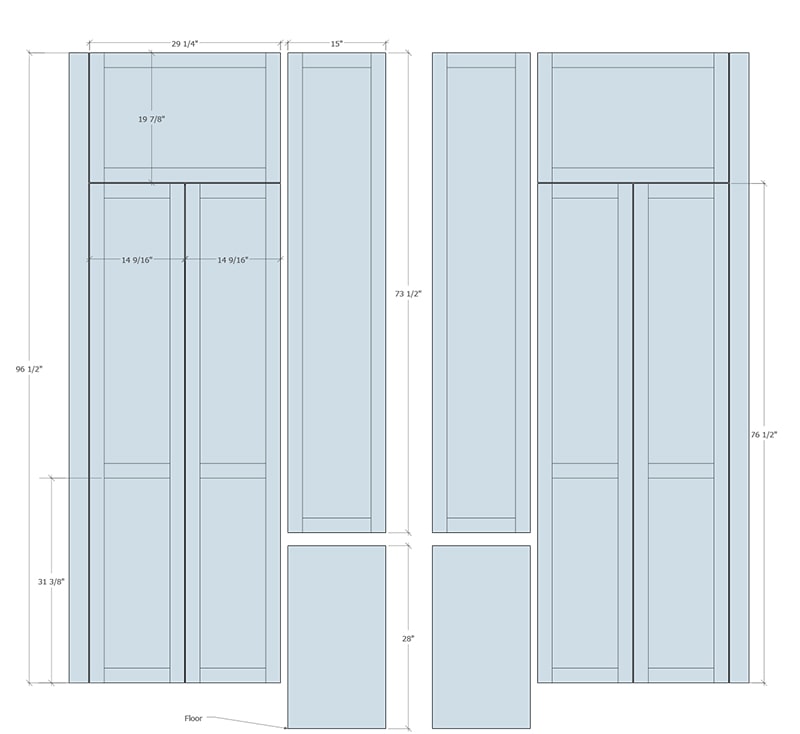
Yes, my brain nearly exploded from trying to calculate all of those measurements. Essentially, we’re placing three wardrobes side by side on the left wall, adding custom drawer fronts in the center, and building our own cabinet boxes with hinged doors along the top (since Ikea doesn’t sell short Pax wardrobes). Here is a very rough (aka visually inaccurate) rendering to give you a general idea of the finished space:
The cabinets will all run floor to ceiling, and I’ll be adding this pierced running trim along the baseboard and below the crown molding. We’ll also be lining the inside of every shaker panel with chair rail trim (to match our bathroom walls).
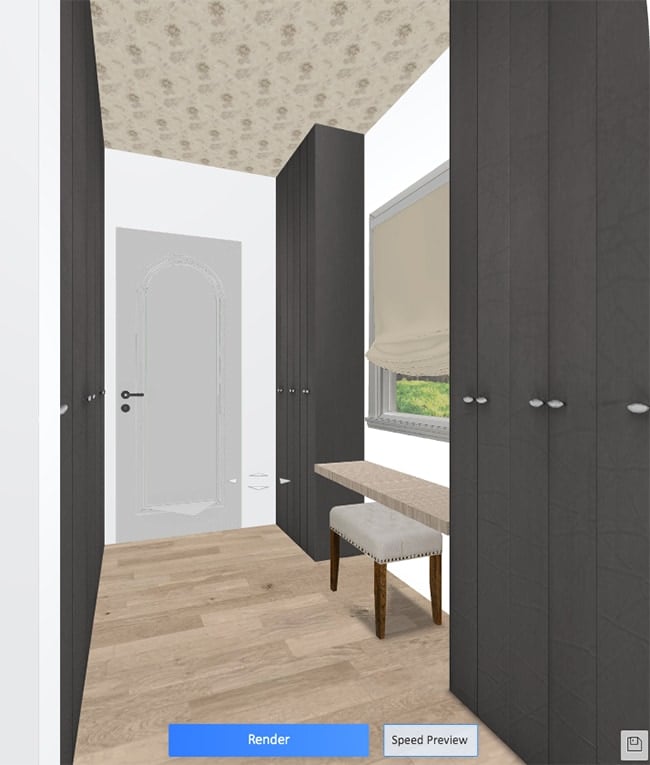
On the left wall, I decided to use two of the 30″ shallow Pax wardrobes so the space wouldn’t feel quite as cramped (these will also have custom 20″ tall cabinet boxes above to reach the ceiling). Under the window, we’ll add a wood vanity desk between the wardrobes, with a custom jewelry drawer underneath and a stool tucked away.
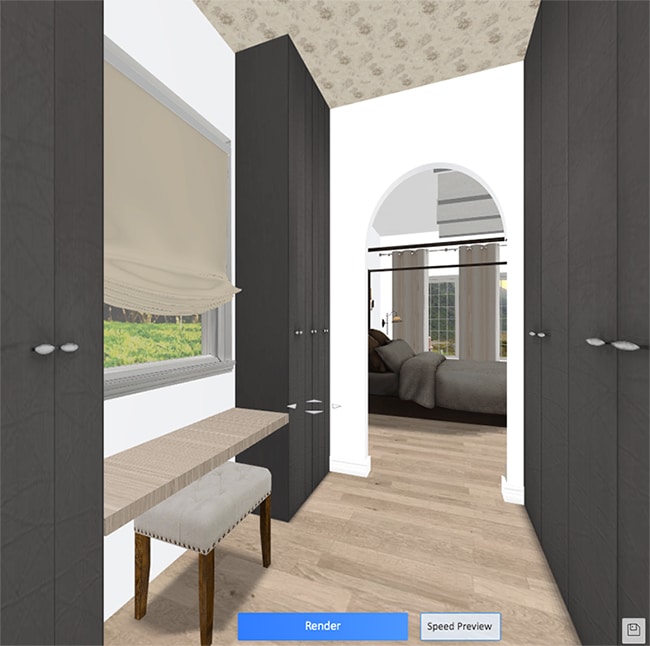
The length of our closet actually worked out pretty perfectly with this setup—by my calculations we’ll end up with just a couple inches of space to fill on either side of both walls. Hopefully it won’t be cutting it too close—we’ll find out soon enough! Here’s an aerial view showing the surrounding rooms (mocked up in Homestyler):
I sent my mockups to The Cabinet Face and got a call back from Kyle (the co-owner/woodworking expert) who carefully double checked every measurement and walked me through a few adjustments that had to be made. I was super nervous about taking on the responsibility of making sure everything was perfect down to the 1/64″ without being able to test anything in person (that’s honestly an impossible task) but I feel much better knowing Kyle test fit everything electronically to make sure I didn’t order the wrong sizes. Here’s a mockup Kyle sent of the left wall, reflecting a couple adjustments we had to make on the drawer sizes and horizontal stile placements.
Of course, I’m fully expecting to run across “surprises” during install (like uneven floors and walls) but hopefully there’s enough wiggle room to make modifications and deal with any discrepancies without them being too noticeable. After completing our playroom built-ins, I feel a bit more confident about taking such a complex project on, but we have our work cut out for us with this one!
We’ll be painting the built-ins a rich black (exact color is TBD) and using gold round knobs (I’m eyeing these). I’ll share all about the install, paint and organization when the time comes, but right now I have some design decisions to make! I spent hours searching for a flush/semi-flush mount ceiling that was eye-catching but not too busy, unique but traditional, and won’t break the bank. Here’s what I found (tap on the image for the sources):
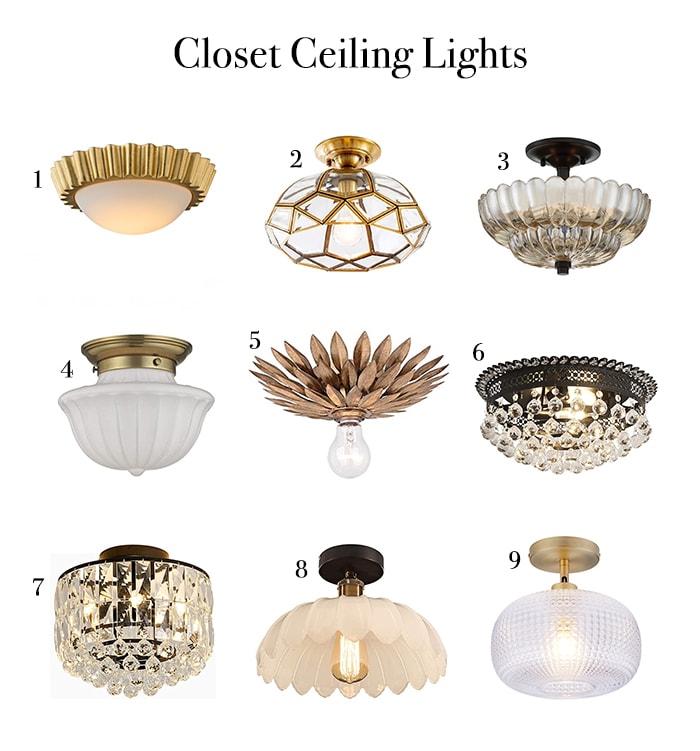
Do you have a favorite? Right now I’m leaning towards #3—that shape and glass color is stunning.
And one more decision—wallpaper for the ceiling! I came up with this idea at the last minute (ahem, yesterday) because I thought the space could use an extra element of surprise and delight. A classic and romantic toile, floral or chinoiserie pattern is what I’m after, and here are the top contenders (tap on the image for the sources)…
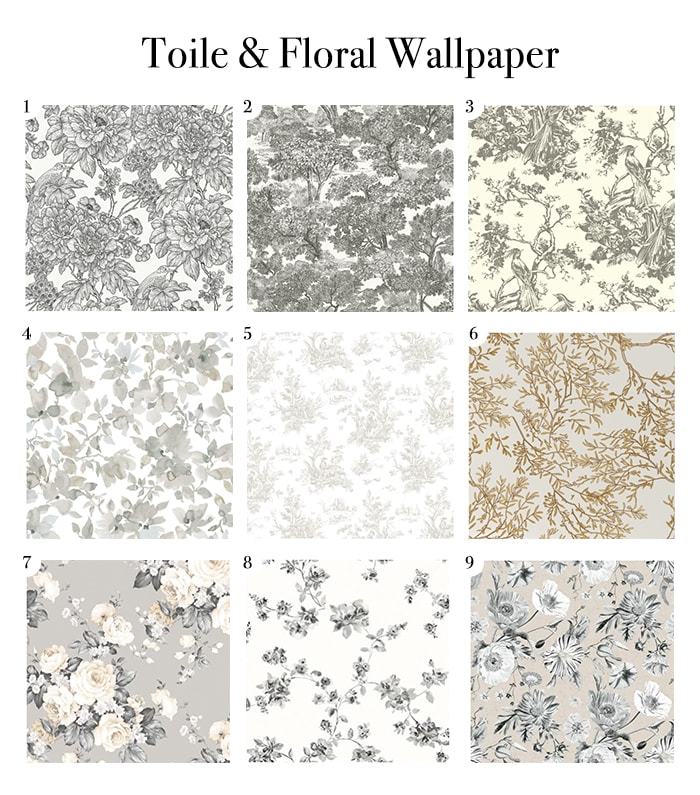
Option 2 is basically the black and white version of our powder bathroom wallpaper (which I am still obsessed with) but I love the roses and subdued colors of option 7. What would you choose?
So, how long will this take?
That is the million dollar question! The biggest potential roadblock is getting the Pax wardrobes, which are currently out of stock and the ETA is constantly changing. We might have to drive across the state twice to get what we need but I’m *hopeful* we can track all of them down in the next few weeks. We can’t really get started until we have those in hand. The custom doors are expected to arrive in 3-4 weeks, and those will require some time to paint and cure before the install. My optimistic goal is to have everything completed by March, but I’d say by April is more likely.
Why add any doors?
I figured some of you might wonder why we’re adding doors inside of a closet. Well, it’s technically more like a hallway to the bathroom, and since there’s no door, it’s very visible from the bedroom. The last thing I want to look at while lying in bed is a wall of clothes and shoes and a dirty hamper. To me, adding doors is no different than adding drawers—you still have to pull something open to access your clothing. It’s also no different than a closet behind doors that’s attached to a bedroom. I’ll be sharing a quick video tour on my Instagram stories today so you can get a better idea of how it flows from the bedroom.
How much will this all cost?
Great question! I haven’t crunched all the numbers yet but I plan to break it down and share the details here on the blog. Custom cabinetry is not cheap, even if you’re starting with Ikea boxes and doing the work yourself. I shared the cost for our custom Ikea built-ins in the playroom, and I’m expecting this project to be in line with those.
Any other questions so far? Ask away! I haven’t decided if I’ll break the progress up into one or two blog posts yet (before the reveal) but you can bet I’ll be sharing real-time updates in my Instagram stories, so make sure you’re following me there! This is going to be a fun one 😉


Emily says
I love following your projects! What good timing as I’ve just started the process of researching building a wardrobe for a small bedroom.
Hallie says
Hi Jenna!
Wow, lots of comments on this one. Closet looks amazing, like all you do. I can’t wait to see that moulding! Another reason for doors is to protect your clothing from the sun.
#9 light with #6 wallpaper. You know I’m right. ?
Carly says
LOVE IT! Great design, and wallpaper the ceiling, it makes the small space extra special and intentional. I like the less dense wallpaper patterns like #4, 6, 8 because you will be looking at the ceiling from a different angle and I think need more spacing between pattern. Light #7 for sparkle, light reflecting from window and glam. Black paint color I have used alot is SW #7609 Iron Ore. It is a black but more soft and to me a timeless classic color. Can’t wait to see it in progress!!!
Megan H says
My comment keeps getting deleted?
Jenna Sue says
Hi Megan, I’m sorry, that’s so strange! I manually approved this one now so all future comments should come through automatically now!
Ronda says
Yay! Another fabulous design that I cannot wait to see take shape. I love light #3 and Wallpaper #6 that you are leaning towards.
I was jsut looking at your site yesterday to remind myself where you got your sofa and the others you suggested. Thank you for always sourcing your finds!
Teddee Grace says
So fun. I like ceiling light #3 and it will look good with the black. All of the toiles are nice. The one you like has some yellow in it. I might go with #5 to keep the ceiling light.
Kami Rossler says
Hi Jenna,
I just came across a light for one of my flips yesterday that reminds me of the styles you are looking at. Thought I would share! It’s called the Ashington 1 light semi flush mount from Joss and Main. Can’t wait to see your finished product!
Laura says
You are so talented and have many great ideas. I like all the wallpapers but love the birds in #3. I also like all the ceiling fixtures but I think a little bling would be cool in your closet like #6 & 7. Looking forward to see your project take shape.
Beth says
Love your plans and look forward to following this project. I would like to check out some of you lighting, but when I tap on one of them, it shows the lights as a single unit and not a link. Can you tell me the name/manuf of #3? Thank you!
Jane Flynn says
As usual, this is going to be stunning!!! I can’t wait to see it all come together. I love how other readers have chimed in with their suggestions. What a community of followers you have built.
Megan H says
NO hate here!! As a new follower I Love Everything you do but that is a really small master closet for today’s standards. Are you concerned at for resale value?? I for one could never get all my goodies in that kind of closet! Lol and Hubby would have to put his stuff in the Garage!!! HAHAHA 😉
Karen says
I’m loving light # 9 and wallpaper # 4. Your plans are amazing. You are truly an inspiration
Vicki says
As always love your design and cannot wait for the during and afternoon.
Love the wallpaper on the ceiling, you may follow Copper Corners, she just released ‘ceiling wallpaper tiles’ from her collection. Looks way easier for install and lots of amazing patterns.